Minolta P’s (Riva Panorama) Camera Review
An Easy, Affordable, Panoramic Point-and-Shoot Film Camera
12 min read by Dmitri, with image(s) by Daren.Published on . Updated on .
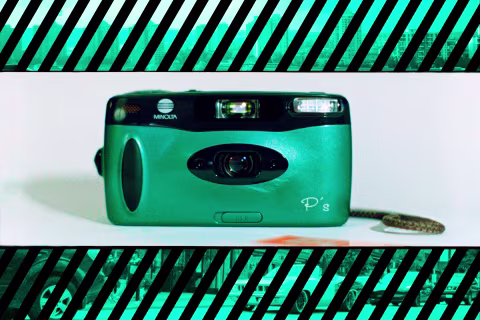
Minolta P’s (Japan) or Minolta Riva Panorama (RoW) is a panoramic point-and-shoot film camera with motorized film transport, autofocus, autoexposure, flash, and a 24mm 𝒇4.5 coated lens. Its shutter fires between 1/4 and 1/200s, it uses a common CR123 battery and accepts DX-coded films between 100-400 (100 being the default ISO). It comes either in gold, blue, green, or red finishes.
Minolta P’s selling point is the panoramic image format. The way the camera achieves that aspect ratio isn’t universally liked, but it’s the results and the user experience that matter the most.
In this review, I’ll explain why I find this camera irresistible and share samples that showcase its abilities. But first, let me explain a few technicalities about the panoramic aspect ratio as well as the wild variations in price points when it comes to achieving it.
In this review: Five ways to go panoramic. How Minolta P’s makes panoramic images and why it’s brilliant. Minolta P’s panoramic viewfinder. Minolta P’s 24mm 𝒇4.5 lens. Minolta P’s exposure guide. Shooting panoramas with flash. Minolta P’s point-and-shoot convenience features. How much does Minolta P’s/Riva Panorama cost and where to find one. Support this blog & get premium features with GOLD memberships!
Five ways to go panoramic.
To this day, panoramic photography reigns supreme on film. Digital cameras use cropping or stitching to create panoramic images. Yet, there are no truly panoramic sensors in commercial production.
1) Cropping is exactly what you’d expect it to be: a standard aspect ratio (typically 3:2) image is captured and then cropped to appear panoramic after the fact. Though effective, it’s not as optimal as capturing on a wide sensor (or a wide strip of film), as nearly half of the image data is thrown out.
However, this method has many advantages, such as a smaller footprint, a flat/distortion-free image plane, and easy-to-scan negatives (if you’re cropping in-camera on film). Cropping is the cheapest way to create panoramas (often free).
Film cameras that use masks to crop images are sometimes called “fake panos,” though I don’t think that name is deserved. This function is common on the 1990s and 2000s point-and-shoot film cameras, but a dedicated cropped panoramic camera is rare (and it comes with certain advantages like better viewfinder, discussed below).
2) Stitching panoramas eliminates image data waste but adds difficult-to-correct geometric distortions (since taking photos at different angles captures different perspectives). This can be countered with shift lenses and elaborate camera setups or during the editing stage. However, those measures require additional effort and do not yield perfect results.
Stitching can cost you time, but it can also cost a decent chunk of money if you use specialized equipment and software to create better results.
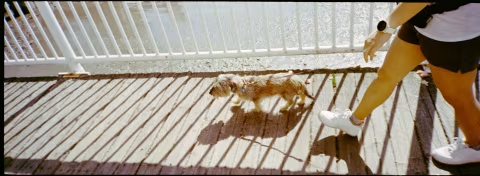
Stitching illuminates the possibility of taking action shots. If anything is moving within the frame, by the time the second shot is taken, the motion will be broken.
3) Swing lens designs work similarly to stitching, except the entire process is finished in-camera during exposure in one motion. As the name implies, a lens would rotate and capture exposure at a wide aspect ratio. Unfortunately, perspective distortion is not corrected by swing lens designs.
A popular digital camera swing-lens equivalent is the iPhone’s Pano mode, whereas on film, Widelux, Seitz Roundshot, and the Horizon are examples of true swing-lens cameras. Swing lens cameras are more expensive than crop cameras, but they are not the most costly design.
Swing lens designs can distort motion significantly and thus aren’t advised for action photography. You also can not use flash with these types of cameras.
4) Anamorphic image compression is a process of using a specialized lens that would squeeze a panoramic image into a standard 3:2 aspect ratio on film, which can then be stretched into a panorama on display. This method is primarily used for video, and it relies on relatively expensive specialized lenses.

5) Fixed-lens/flatback panoramic film cameras, a.k.a. “true” panoramic film cameras, can take full advantage of the medium (no cropping, no image data waste, no geometric distortions). They work by using oversized lenses to create large image circles which can cover a wider portion of the film.
Fixed-lens panoramic cameras have no trouble capturing fast action shots; however, they are more expensive than all of the above options (i.e., Hasselblad XPan ~$5,000) and are usually the bulkiest rigs due to the amount of glass required to make their lenses.
An economical alternative to dedicated fixed-lens cameras is to use smaller format film in a larger format camera with adapters. For example, you can make panoramic images on 35mm film by loading it into a medium format camera. However, you would also need a viewfinder adapter or risk cutting important parts of your image, as the camera’s native focusing screen would not show image fringes correctly. These cameras are also bulkier than their dedicated panoramic counterparts and may have trouble shooting horizontal panorams if the film transport is vertical.
Given the technical challenges of creating wider images, it would make sense to consider whether panoramic photography is worth the effort. 👈 This linked article section explains the value of the panoramic aspect ratio and its applications.
How Minolta P’s makes panoramic images and why it’s brilliant.
Cropped panoramas are technically inefficient, especially when it comes to an expensive medium such as film. The way Minolta P’s done it and many point-and-shoot cameras of the 1990s and early 2000s had done it is in camera is by simply masking part of the film. This produces negatives with just a third of their total area dedicated to an image.
While it’s a little upsetting to waste physical material, the results do not have to be bad or lack resolution. I’ve made sharp, detailed images with my half-frame cameras and expect no less from a crop film camera.
Any photo can become panoramic after sufficient cropping. However, cropping in-camera lets you compose the shot with more intent and avoid unnatural perspective when the crop is off-center.
A good panoramic viewfinder can help you frame the scene quickly and accurately. Unfortunately, most point-and-shoots that use in-camera masking also mask the viewfinder, making the window smaller and harder to frame with.
Minolta P’s was designed to avoid the bad viewfinder flaw while retaining the ultra-compact profile and amenities (i.e., autofocus, motorized film transport) of a modern point-and-shoot film camera.
Other advantages of cropping film panoramas in-camera include the imperfect and unique soft border and faster processing on flatbed and dedicated film scanners.


Minolta P’s panoramic viewfinder.
Minolta P’s panoramic viewfinder feels as wide and as bright as the legendary XPan finder. It’s easy to compose with and a lot of fun to observe the world from. But unlike XPan, Minolta P’s can easily slip into your pocket.
The viewfinder is tuned to show the built-in 24mm 𝒇4.5 lens’ 77-degree horizontal angle of view, which is wider than XPan’s kit 45mm lens’ 71-degree AoV.
The viewfinder has 50% magnification and 83% coverage at 3m; thus, you should expect your images to appear a little wider than composed. It also has a great eye relief distance, so it is perfectly usable with glasses.
Minolta P’s 24mm 𝒇4.5 lens.
In addition to its large panoramic viewfinder, Minolta P’s features one of the widest lenses in its class. This is necessary to create images that have a similar angle of view as the human eye with in-camera cropping:
A natural-looking panorama (as seen with both human eyes) should start with a “normal” 50mm focal length on a full-frame format (36×24mm) and extend further to the sides. But because cropping essentially changes the size of the 3:2 box from 36×24mm to around 13.5×9mm, an ultra-wide lens, such as Minolta P’s 24mm 𝒇4.5, is needed to create natural-looking panoramas.
Minolta P’s ultra-wide lens is another reason to use this camera over other point-and-shoots with crop masks, as those other cameras’ longer lenses will make panoramas appear as if you’re permanently “zoomed-in.”
No complaints about the relatively slow maximum aperture of 𝒇4.5. Lenses this wide are challenging to build within such small proportions; even XPan’s incredible optics don’t open any wider than 𝒇4.
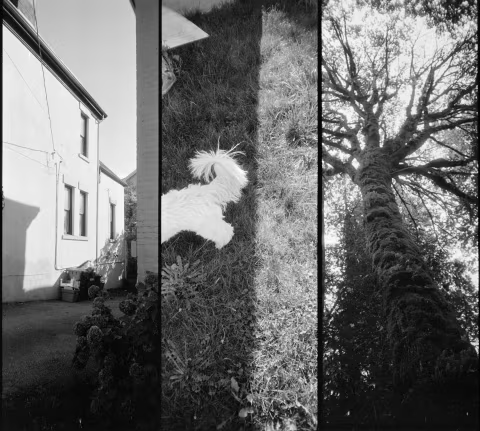
However, when it comes to image quality, Minolta P’s lens suffers. Despite all of its five coated glass elements in five groups and built-in autofocus, most photos I made with this camera looked soft — especially in the edges.
Sharpness isn’t the most important or valuable aspect of a lens. Riva Panorama’s lens can do things most other point-and-shoot lenses can’t (i.e. produce a 77-degree horizontal angle of view). Still, I wouldn’t expect to print large or display on a huge monitor and hope to see crisp detail.
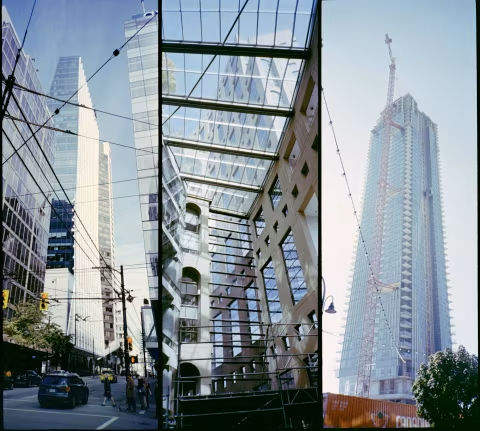
My creative solution to the missing image resolution is to assemble triptych collages — which hide the lens’ imperfections well, look great on screens of all sizes, and offer unique visual storytelling possibilities:

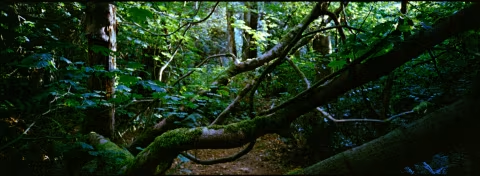

On the plus side, when it comes to image quality, Minolta P’s 24mm 𝒇4.5 lens renders a lot of contrast at all apertures.
Minolta P’s exposure guide.
Minolta P’s lens is the least sharp at its widest apertures. And the bokeh that you may be getting at 𝒇4.5 is not worth the effort (unless you’re looking for coma distortion that can make your image appear smudgy).
For the sharpest and probably best-looking photos, I suggest using an ISO 100 film for full sun and ISO 400 film (with a DX code) for shade up to EV 12¹. The above settings will force your camera to use its optimal aperture (around 𝒇8).
Photos in situations any darker than a light shade — including indoors — may work better with flash.
¹ — You can preview what EV 12 looks like with the Sunny 16 Calculator app.
Shooting panoramas with flash.
The maximum distance for the flash to work with this camera is 18’/5.5m with an ISO 400 film. If you have an ISO 100 film, its furthest would be 9’/3m. The closest distance for flash is the same as the closest focusing distance for the lens — 3’/1m.
The difference between Minolta P’s and other point-and-shoots when it comes to subdued light photography is, again, the viewfinder. While other cameras use movable masks that collapse their viewfinders to a smaller, dimmer window, Minolta P’s enormous viewfinder stays large and bright, making composing in subdued light strain-free.
Of course, a fixed on-board flash isn’t always the best way to take natural-looking photographs, and it can cause unpleasant colour shifts. You can disable yours by holding down the button on the top-left with a crossed-out flash icon as you take your shot — you will need to hold your P’s with both hands to do that. 👀
Or, you can shoot black-and-white film with your Riva Panorama to avoid colour issues while making well-lit images at the camera’s sharper apertures.


Minolta P’s point-and-shoot convenience features.
Shooting with Minolta P’s is the easiest and the fastest way to make panoramic exposures. It has a fantastic viewfinder; everything is done in-camera; the lens, despite its drawbacks, has an ideal focal length, and the camera comes with flash — which is rarely the case with any other dedicated panoramic options.
Riva Panorama fits in a pocket; it has autofocus, auto-exposure, and motorized film transport that will leave the tip of the film out after it completes rewinding (very helpful for those who develop film at home). Film scanners may also spend less time digitizing P’s frames as they can be set to operate only in the cropped area.
I really wish P’s had a sharper lens as I tend to look at my images on a hi-res computer monitor and enjoy printing large. But even with that drawback in mind, I can’t seem to put this camera down. It’s incredibly easy to use and tons of fun.
How much does Minolta P’s/Riva Panorama cost and where to find one.
Minolta P’s cost less than $100 in 2023/2024, which is below the mark for even the modest non-panoramic point-and-shoot film cameras.
❤ By the way: Please consider making your Minolta P’s/Riva Panorama purchase using this link so that this website may get a small percentage of that sale — at no extra charge for you — thanks!