What Is an Aperture and How Does It Work?
An Essential Camera Component
16 min read by Dmitri.Published on . Updated on .
The workings of apertures eluded me for a long time. Though I’ve learned what apertures are used for fairly quickly — controlling the amount of light that falls onto film — their agency remained a mystery for longer.
A shutter’s function is simple: it creates a precise window of time for film to saturate with light. The longer the shutter stays open, the brighter the image becomes. But an aperture is a lot more mysterious. How does it manage to cut parts of the light’s path without cropping the image itself? And how does it change the exposure by doing so?
There are barely any guides online that explain how apertures work fully. Instead, most focus on their application in photography, with little attention to the working principles. This fills that knowledge gap.
In this guide: What is an aperture? How apertures differ from shutters in their function. A simple experiment you can try at home. What is an F-stop? The mathematics of aperture stops. How apertures affect depth of field. Bokeh. Aberrations at maximum apertures. Diffraction at minimum apertures. Starburst effects. Choosing an optimal lens aperture. Aperture controls. Use your aperture to control flash exposure. Aperture as a shutter. Pinhole: an aperture as a lens. Support this blog & get premium features with GOLD memberships!
What is an aperture?
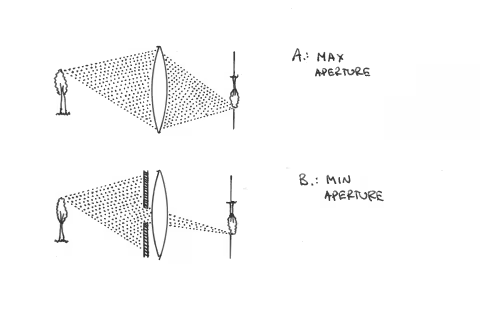
An aperture is the opening through which the light can enter the camera. The volume of that light can be controlled by altering the size of an aperture, which is done with an aperture diaphragm.
In a typical lens, an aperture could be open, meaning that the lens will be gathering the most light it could. Or it could be stopped down, which means that the aperture diaphragm’s diameter is decreased.
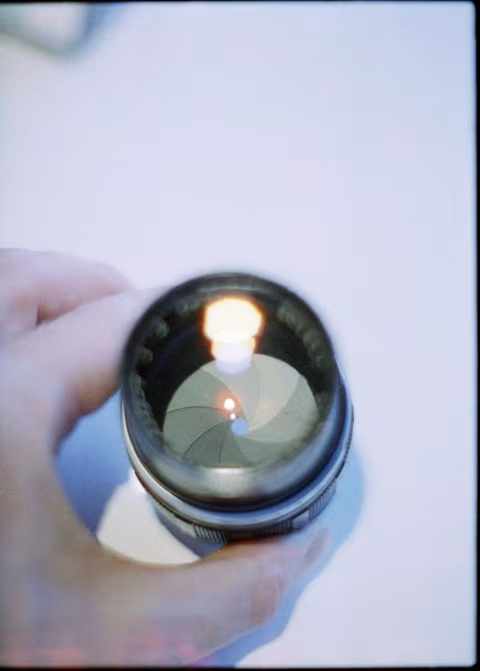
Most lenses’ diaphragms are made of blades that individually look like a black metal flower’s petals, arranged in a circle. When you twist a ring on your lens, the blades move and either increase or decrease the diaphragm’s diameter.
✪ Note 1: Some lenses will have their aperture blades hidden behind a leaf shutter — another kind of diaphragm.
An aperture diaphragm often looks like an iris in a human eye. This is because they both perform precisely the same function: control the light’s flow.
An aperture’s purpose is to control the volume of light that falls onto the film plane. Though shutters can also control exposure, apertures do it differently.
How apertures differ from shutters in their function.
Imagine that you are next to your kitchen sink with a glass and a stopwatch. If you open up your tap to its fullest, the water will fill the entire glass within five seconds. But if you open your tap halfway, you can safely assume that your glass will take ten seconds to fill — half the flow, double the duration.
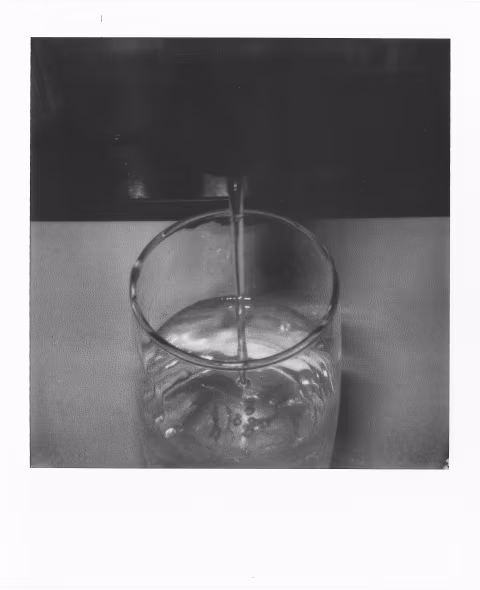
If you measure your water flow precisely, you won’t even have to look at the glass to know when it’s about to get full. Your stopwatch will signal you to shut off the tap.
In photography, apertures control the volume of light like your tap’s valve controls. A camera’s shutter, on the other hand, controls the duration of an exposure, like the stopwatch that tells you when to turn your tap off to avoid overfilling the glass.
In other words, an aperture controls the volume of light reaching the film while a shutter controls the duration of an exposure.
A simple experiment you can try at home.
A larger aperture diaphragm’s opening lets more light onto film, while a constricted (stopped-down) aperture carries decreased light power. In this section, I’ll show you how you can observe this effect with a loupe and a light bulb.
Before we continue with the demonstration, you should understand that the location of aperture blades in a lens system is important. As you can see in Figure 1, they are close to the focusing element. In this position, they effectively decrease the radius of the lens and thus limit the amount of light it can gather. If placed close to the film plane, however, the aperture blades will blackout the edges of the image without affecting its brightness.
You can play around with the distance between your fingers and the loupe to observe this effect when you try this at home:
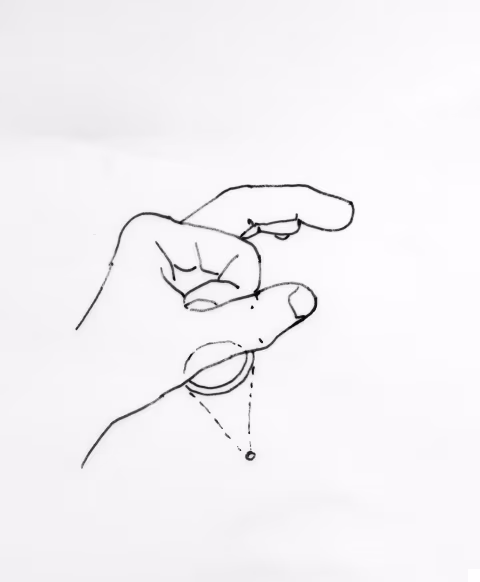
To observe the effects of an aperture, grab your loupe and find a dark spot in your house. Turn a single lamp on and place your loupe underneath it so that you can see a small, focused outline of your light on any flat surface. It may look like a ball of light with sharp edges. Or, if you have a chandelier, you should recognize its shape.
Then, make a circle with your thumb and index finger that’s slightly smaller than your loupe in diameter and place it above or below your lens — as close to the glass as you can. Your focused lamp’s image should get a little dimmer. The image will dim even further as you squeeze your fingers to make a smaller circle.
But if you move the circle you’ve made with your fingers close to the surface that has your lamp’s image projected, you’ll notice that you are no longer affecting the image’s brightness.
What is an F-stop?
In photography, where a barely noticeable change in light can spell the difference between a great photo and a ruined image, setting exposures precisely is important. An aperture, being an instrument that controls exposures, has to be measured and controlled accurately.
However, the diameter of an aperture alone isn’t a convenient way to measure its effectiveness.
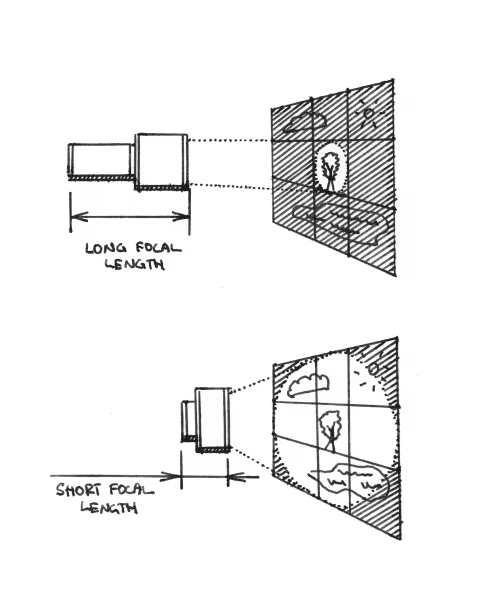
Consider that the longer the lens’s focal length is, the smaller its angle of view. That is, longer focal lengths allow your lenses to become more “telephoto.”
However, longer focal length lenses need a larger aperture radius to compensate for the diminished light coming from a smaller angle of view/area.
Therefore, we can not ignore the lens’ focal length when calculating an aperture’s effectiveness. The diameter alone can’t tell the whole story. This is why we use the 𝒇-stop numbers:
𝒇-stop numbers are ratios of lenses’ focal lengths to their aperture diameters. They are used to measure the effectiveness of a lens’ aperture.
For example, an 𝒇/2 or number on your lens means that the aperture diameter is 1/2 the size of the lens’ focal length. A smaller fraction, 𝒇/4, means that the aperture diameter is 1/4 of the lens’ focal length.
✪ Note 1: You may find f-stop numbers written in various ways. You’ll see “f/8” as one of the most common ways (substitute “8” for any valid aperture number). Lens manufacturers write them as “1:8” for the maximum aperture and just 8 on the aperture scale. On this blog, I typically write them as 𝒇8.
So, what is a stop?
In photography, a stop of light is a log base 2 value that comparatively measures the light volume or sensitivity. Put simply, each incremental stop doubles the brightness of an exposure.
With film, stops indicate the difference between emulsion sensitivities. For example, ISO 400 film is twice as sensitive — or one stop faster — than ISO 200 film. An ISO 100 film is four times less sensitive than ISO 400 — or two stops slower.
✪ Note 2: In photography, a system that yields a brighter exposure is often referred to as “faster.” A “slower” system would similarly yield dimmer exposures.
Shutter speeds can also be compared using stops. For example, a shutter speed of 1/500 lets half the amount (or one stop less) of light onto film than 1/250.
Finally, aperture 𝒇-numbers one stop apart look like this: 𝒇16, 𝒇11, 𝒇5.6, 𝒇4, 𝒇2.8, 𝒇2, 𝒇1.4 — where larger numbers (being fractions) indicate physically smaller aperture diaphragm openings. These numbers don’t follow simple patterns like shutter times and film speeds that double or half with each stop. There’s a math reason for that.
☝︎ Further reading: “What Is Exposure and How to Measure It.”
The mathematics of aperture stops.
✪ Note: You can skip this section as it has little practical application while shooting film. However, I found it helpful/fascinating to understand what those numbers mean.
The 𝒇-stop numbers are calculated using this formula: 𝒇/N = d, where 𝒇 is the lens’ focal length, N is the 𝒇-number (i.e. 2 or 2.8), and d is the diameter of the lens’ aperture. The area of an aperture is πr² or π(d/2)² — since a radius r is half of the diameter. Substituting the diameter for 𝒇/N, an aperture’s area becomes π((𝒇/N)/2)² or π(𝒇/2N)².
Now, let’s assume we’re working with a lens with a 50mm focal length and a maximum aperture of 𝒇2. To decrease the exposure by half (i.e. by a single stop), we’ll need to half our aperture’s area. Using the formula above, we’ll get:
½(π(50/(2×2))²) = π(50/2𝒙)²
Where 𝒙 is the 𝒇-number for an aperture that would have half an area of 𝒇2 and thus one stop slower. Solving that, we’ll get:
½(π×12.5²) = π(50/2𝒙)²
245.4369260617 = π(50/2𝒙)²
78.125 = (50/2𝒙)²
8.8388347648 = 50/2𝒙
8.8388347648×2×𝒙 = 50
17.6776695296×𝒙 = 50
𝒙 = 2.8284271248
And so goes the progression: 𝒇2, 𝒇2.8, 𝒇4, 𝒇5.6, 𝒇8, 𝒇11, 𝒇16, etc.

Some manufacturers also mark fractional aperture numbers in half or ⅓ stops. For example, 𝒇1.4 — 𝒇1.7 — 𝒇2 (where 𝒇1.7 is halfway between the “whole” aperture numbers), and 𝒇2.8 — 𝒇3.2 — 𝒇3.5 — 𝒇4 (where 𝒇3.2 and 𝒇3.5 are thirds of the way between the “whole” numbers).
How apertures affect depth of field.
Depth of field describes the amount of background and foreground blur in your photographs. A greater depth of field means less blurring (a larger area remains in focus), and a shallower depth of field means more blurring.
Aperture size, your lens’ focal length, and your focus distance have a direct effect on the depth of field.
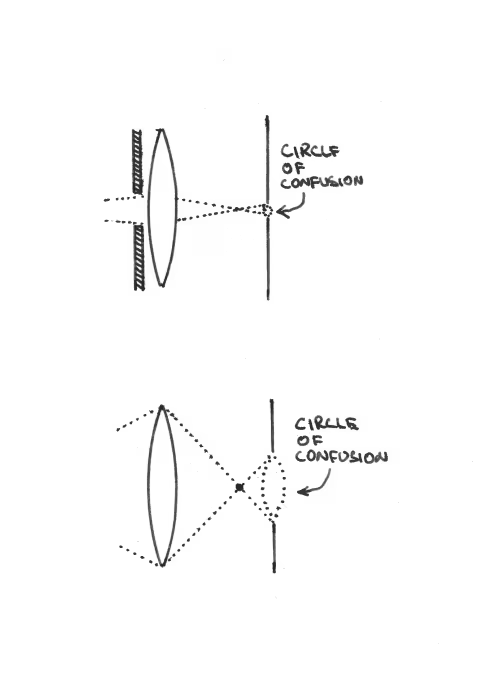
The reason for such a relationship is a circle of confusion — a cone of unfocused light when it intercepts the film plane. Larger apertures direct more light through their wider cones of light, which yield larger circles of confusion when the focus is off.
Additionally, longer lens’ focal lengths will create shallower depths of field (more blur) at the same 𝒇-stops as shorter focal length lenses. This is because the aperture area of a longer focal length lens needs to be larger than that of a shorter focal length lens to yield the same 𝒇-stop number.
For example, a 100mm 𝒇2 lens will have a shallower depth of field than a 50mm 𝒇2 lens. The 100mm lens will also have a much larger aperture radius.
Note that the size of your circle of confusion is relative to your film format (which determines the size of the film plane). So if you shoot a smaller film format with the same lens’ focal length and aperture, your depth of field will decrease; that is, you’ll have more background blur.
However, unless you change your lens’ focal length, your field of view/angle of view will also change (on a smaller format, your scene will look “zoomed-in”). Matching a smaller format’s field of view to that of the original format requires decreasing the lens’ focal length, resulting in an overall larger depth of field. Hence, less background blur on smaller formats with the same aperture 𝒇-number and angle of view.
Lastly, when you come closer to the subject and change the focus to reflect that, your circle of confusion will grow in size, your depth of field will shrink, and you will get more background separation.
Similarly, focusing on infinity will create the largest depth of field. However, you can still have subjects close to you appear out of focus.
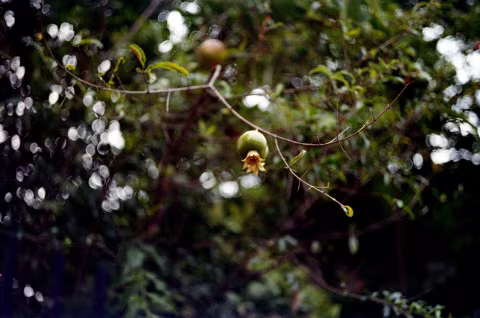
Bokeh.
The quality of background blur is often referred to as bokeh. Sounded from Japanese “暈け” or “ボケ,” the word is meant to apply specifically to lens blurs rather than motion blurs.
Your aperture blades also play a part in shaping your bokeh balls. For example, you may want to shoot your lens wide-open to get nicely rounded ovals and circles. Some lenses will even let you customize the shape of your bokeh highlights.
If you want more bokeh, you should increase your lens’ focal length, shoot a larger film format, increase your aperture’s size, or get closer to your subject.
☝︎ Further reading: “What’s Bokeh and How to Get It on Film?”
Aberrations at maximum apertures.
Knowing that larger apertures yield brighter exposures and more pronounced bokeh, you may be tempted to shoot your lenses wide-open (at their maximum aperture) as much as possible. However, doing so can make your photos appear less sharp.
Light rays travel at more extreme angles on the fringes of the lens’ glass, which makes designing a precise system to rein them in difficult. Stopping down the aperture or decreasing its size excludes those difficult edges, thus resulting in a sharper rendering of the in-focus elements of your photograph.