How to Zone Focus Quickly and Accurately

For Fast Action, Night Photography, and Specialty Cameras

11 min read by

Above: FED-5b with Industar-61 and Vitssa A (reviewed here and here).

Zone focusing, a.k.a. scale focusing, is a powerful photographing technique that can help you be faster, more confident with your camera and take better shots in subdued light. This skill is indispensable for film and street photographers.

What is zone focusing?

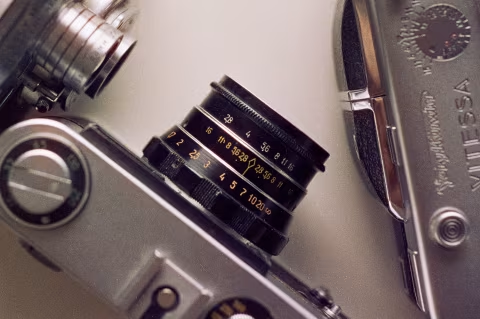
Zone focusing means guessing the distance to the subject and dialling that value on the lens. This used to be the only way to focus before the invention of ground glass, SLR prism, rangefinder, and autofocus tools.

Today, it is still used on toy cameras like Diana Mini and viewfinder-only cameras like Rollei 35. Zone focusing is also useful on cameras with precision focus tools like an SLR and even on autofocus/digital cameras (see: hyperfocal focusing and prefocusing).

You may have employed zone focusing in your photography already. If you’ve ever seen the icons on your camera like this:

👤 👥 🏔

…and used them to set the distance on your lens — you’ve been zone focusing.

Despite the lack of precision implied by the guesswork, zone focusing can be a better choice when speed is of the essence and in cases when autofocus isn’t able to detect the distance correctly or when it’s too dark to peer through the viewfinder.

How to master zone focusing.

Zone” in zone focusing means that the distance scale is split into distinct sections (zones). Dividing the progression of distances into a few slices that you can recognize can make the job a lot easier and more accurate.

There are no set rules on what those zones should be. Most cameras divide the scale into three zones, sometimes marked the icons 👤, 👥, and 🏔. They are commonly understood as “portrait” (👤) — which is the closest distance your camera can focus on, typically 1m/3’, “group portrait” (👥) — which is usually around 3m/10’, and “infinity” (🏔).

Of course, guessing the distance can not always yield complete accuracy. And while it is possible to be nearly as proficient with zone focusing as you may be with a rangefinder or SLR, that kind of skillfulness may take months or years to acquire. The good news is that you will seldom need that level of exactness to make perfectly sharp photographs. Understanding concepts such as depth of field and hyperfocal focusing can yield sharper results without the need for “laser” precision; your visualization of distances can also go a long way.

Let’s dive in.

Depth of field calculator on Voigtländer Vitessa camera. The numbers 2 through 16 indicate lens apertures, while the number markings on the inner circle are distances in metres. In its current position, everything between 4.5m and infinity would be in focus when shooting at 𝒇16.

Zone focusing and depth of field (DOF).

You may have seen photographs where everything, near and far, looks in focus. These kinds of images are said to have a deep depth of field. They are typically taken with wider lenses, on smaller film formats, with smaller apertures (higher 𝒇-number), focusing on distant objects.

This photograph was taken with zone-focused Rollei 35S at a shallow depth of field. The bee is in focus, but the flowers far away are quite blurry.

If, on the other hand, a longer lens, larger film format, and a larger aperture (smaller 𝒇-number) were used to focus on objects up-close, a lot less would appear in focus. An image like that is said to have a shallow depth of field.

Because zone focusing involves guesswork, increasing your depth of field by choosing smaller apertures and photographing objects further away will give you a much wider error margin. In addition, wider lenses and smaller film formats will further improve the overall sharpness of your images.

✪​ Note: Your camera may not allow you to choose your aperture. In that case, feel free to skip down to “Choosing your film ISO.”

Many camera manufactures include DOF calculation markings on their lenses to give you an idea of how much of your scene will be in focus at a given aperture and distance.

For example, the Industar-61 lens, above, is set to 5m (the ring closest to the camera body) and an aperture of 𝒇5.6 (the ring furthest away from the body). Now, if you refer to the middle ring, the two 5.6 markings correspond to ~4 and 10 metres, which is your depth of field. This means that everything between 4m and 10m away from your camera should be in focus.

If you were shooting at 𝒇16 on the same lens with the focus set to 5m, everything beyond 2.5m would appear in focus.

However, it is not always advisable to photograph with the smallest apertures on your lens. Especially on smaller formats, your overall image sharpness will decrease slightly on apertures 𝒇11 and greater. This is because even the best glass is susceptible to light diffraction, which is a physical phenomenon causing fine points of light radiating wave-like patterns. Ultimately, this may not matter for your photography as the effect is subtle (even more so on larger formats), but I find it helpful to be aware of and prevent whenever possible.

This photograph was taken with zone-focused Zeiss Ikon Werra Werramat at a deep depth of field. As you can see, everything is in focus, including the person who’s about 7m/23’ away and the glass building that’s more than 200m/650’ away from the camera.

Finally, as you attempt to increase your depth of field with smaller apertures, I advise you to consider your shutter speed as well. Smaller apertures/higher 𝒇-values will proportionally require you to slow down your shutter to accommodate for the decreased amount of light. Thus if you aren’t using a tripod or a flash, I recommend you keep that in mind as speeds below 1/60th of a second may introduce motion blur, even if your subject is motionless. This, of course, depends on the steadiness of your hand, the amount of shake your camera’s shutter introduces, and the focal length of your lens.

Longer lenses will need higher shutter speeds to avoid blur; wider lenses will be more forgiving. I usually aim to shoot at 1/250th of a second whenever possible, which I ensure by picking a higher-ISO film for my scenes.

“f/8 and be there.”

By now, you should know that increasing the depth of field with smaller apertures, choosing further objects/subjects to photograph, and picking wider lenses whenever possible can yield sharper results. You should also know that apertures smaller than 𝒇11 may introduce some softness and possibly force you to use slower shutter speeds that may introduce motion blur.

This is a lot to consider. To make things simpler, photographers came up with a rhyme: “f/8 and be there.” You may find it particularly useful as the 𝒇8 aperture typically does not suffer from diffraction, yet it is small enough to have a large depth of field on most normal and wide-angle lenses.

For example, setting your aperture to 𝒇8 on a 50mm lens (when you shoot full-frame 35mm film) and the focus distance to 9m or 30’ should render everything beyond 4.5m/15’ sharply. With a 28mm lens, you may set the distance to 4m/13’ to have everything beyond 2m/6.5’ in focus.

Some lens manufacturers will highlight certain distances (like the 9m on 50mm lens or 4m on 28mm lens) that are especially convenient for zone focusing.

This photograph was taken with zone-focused Chinon Bellami. I used the hyperfocal focusing technique to keep everything, from the road tiles nearby to the condo on the horizon, in focus.

Hyperfocal focusing.

You may have noticed from the chapter above that you can have your furthest objects in focus without having your lens set to infinity (i.e., 9m on a 50mm lens with 35mm film at 𝒇8). Doing so is called hyperfocal focusing.

Hence to “hyperfocus,” refer to your depth of field markings to set the closest distance that includes the infinity within your DOF.

This method is often used by landscape photographers wishing to have the entire scene in focus. Because you are effectively shifting the focus point closer, objects that aren’t far will appear sharper while the horizon will remain well-defined.

With hyperfocal focusing, you are ensuring improved sharpness across your scene “for free.”

Hyperfocal focusing is a type of zone focusing. It isn’t typically achievable with autofocus/rangefinder/SLR aids alone.

Choosing the right film ISO for zone focusing with your camera.

If you’d like to take advantage of the “f/8 and be there” rule and avoid motion blur caused by slow shutter speeds and overexposures, you may want to select your film before leaving the house.

For example, ISO 100 film will typically have you shoot at 1/500th of a second on a sunny day at 𝒇8. This combo is convenient as it provides flexibility for shooting in the shadows without motion blur while ensuring that a film camera’s typical top shutter speed is not surpassed.

If you measure the light in your brightest scene ahead of time, you can find your optimal ISO value for your camera’s top speed at 𝒇8. Of course, you may add a few stops for more flexibility in the shadows if you don’t mind stopping down your lens further in the bright light or some overexposure.

Your film speed selection is important even for the cameras that do not allow you to set your aperture. Using this method, along with your knowledge about your camera’s smallest aperture and top shutter speed, will ensure you won’t have to deal with overexposures and will yield better results.

✪​ Note: The reason I suggest selecting film based on the brightest scene is that overexposure can not be prevented once you reach your camera’s top shutter speed and smallest aperture. Underexposure can usually be remedied by lower shutter speeds, even though that may cause motion blur without a tripod — unless you are using flash.

Zone focusing on infinity. 🏔

Infinity is the easiest distance to zone focus. Set your lens to the infinity ∞ mark or use hyperfocal focusing to get more definition out of your scene.

This portrait was taken with zone-focused Chinon Bellami. Despite its relatively shallow depth of field, I was able to get Betty in focus by imagining/remembering how long a metre should be and holding my camera at that distance away from her.

Zone focusing portraits. 👤

Because your depth of field will decrease when photographing things and people up close, you may find this distance tricky to master as it requires more precision. Visualizing your camera’s closest distance (typically 1m/3’) is key. I rely on memory and imagination.

When I was a preschooler, my grandpa taught me that a metre is roughly the width of my extended right arm to my left elbow. Today, the metre ends at the left side of my chest. My feet, being a size men’s 9US, are a bit shorter than a measuring foot. We’re all a little different, but there’s no need for extreme precision. The advantage of using your body to measure distance is that, for people, it’s a natural thing to do.

Another way to learn this is by practicing with an SLR or a rangefinder. Either by peering through an empty camera as a dry run exercise around your house or by paying additional attention when taking photographs on film at close distances, you should eventually develop a knack for it.

Whether you’ll be imagining your body as a measuring tool or simply develop a feel, visually measuring distance is not as hard as it may seem. Together with your knowledge about the depth of field and your experience as a human being who is eventually forced to estimate sizes, you will be able to get sharp close-ups, even at wide apertures.

Give it time, pay attention and practice. I suggest visualizing over physically stretching out your body parts.

Zone focusing “group portraits”/middle point distances. 👥

With a deep enough depth of field, your 5m/16’ mark should render all but the closest distances and the infinity in focus. From there, you can make small adjustments in either direction.

This is a great starting point for street photography where you typically won’t (and probably shouldn’t) stick your camera into strangers’ faces. At the same time, you’re likely to be surrounded by buildings and people much closer than the horizon.

Prefocusing.

Prefocusing is a simple technique that involves anticipation. Instead of trying to keep up with a moving object or a person, you would set the focus for a distance where you’d expect them/it to arrive and press a button on that cue.

For example, if you have someone walking towards you from afar, set the focus to 3m and wait until they’re in range. Once they’re near your mark, clicking the shutter is the only thing left to do.

Prefocusing is much simpler than trying to adjust your distance continuously. It is also faster, even if your camera has autofocus — since all distance adjustments are already set ahead of time.

Zone focusing aids.

If your confidence levels are still low, you may use a “cheat.” The simplest one is to carry one or more pieces of measured string. You can use them to help estimate close distances where the depth of field is shallow and precise estimations are more important.

Alternatively, you may get yourself an external rangefinder.

Remember to set the distance!

When I started learning zone focusing, the main reason I ended up with blurry photos was not for the lack of precision; it was almost always due to me forgetting to set the distance on the lens ahead of time.

With no SLR focus preview or a rangefinder patch, zone focus-only viewfinders make everything appear sharp. And thus, ahead of everything else, do this:

🚨 Remember to zone focus before taking your shot.

By the way: Please consider making your film-related purchase using the links above  so that this website may get a small percentage of that sale — at no extra charge for you — thanks!