What Is a Rangefinder Camera and How to Use It Well

17 min read by
Classic rangefinder design.

A rangefinder is an iconic film camera design made for quick, precise focusing. Rangefinder cameras can be lighter and more compact than SLRs, but they take some getting used to and require occasional maintenance.

This guide explains what rangefinders are, how they came to be, and how they compare against viewfinders and SLRs. The article also includes focusing techniques, maintenance tips, and purchase advice.

What is a rangefinder camera?

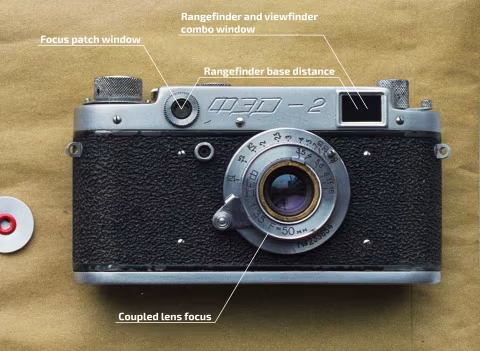
In photography, a rangefinder is a camera with an optical rangefinder mechanism used as a focus aid.

You can identify an optical rangefinder by a split-image inside the eyepiece that you can merge by turning a ring or a wheel.
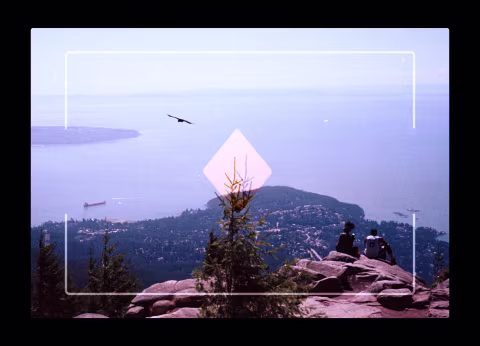
A view through a rangefinder camera’s eyepiece. The rhombus in the middle is the rangefinder patch with an overlapping split image. The overlapping image does not match hence the tree in the middle of the frame will be out of focus. At the top and bottom of the viewfinder are illuminated frame lines that show which part of the image will be cropped onto film.

The split-image may appear as a translucent, overlapping picture or as two halves of a picture, one of which can move horizontally parallel to the other. Your split-image may show up inside a small patch in the middle of the viewfinder (in a viewfinder/rangefinder combos), or it could take up the entire view. A rangefinder patch could be shaped as a rectangle, a rhombus, or a circle.

A rangefinder can be coupled to the focus or uncoupled. The former means that your camera’s lens focus changes accordingly as you adjust your rangefinder split-image. The latter means that you will need to adjust the split-image, then read the rangefinder value (distance) and transfer that value to your lens. More on that below.

Figure 1. Optical rangefinder working principle.

Optical rangefinder working principle.

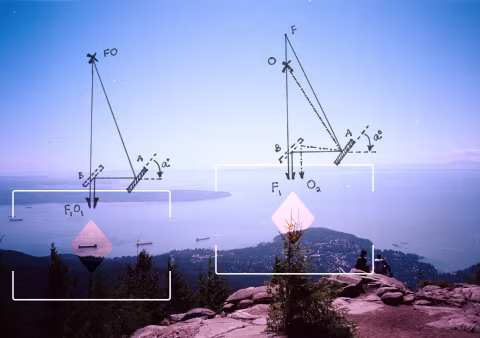
An optical rangefinder works using triangulation.

In Figure 1 (above, left), mirror* A reflects the image of a target object (O) into a translucent mirror (B) that merges it with the direct image line (F→F₁) into a single image F₁O₁. This indicates to the photographer that the target object O is in focus. The angle ɑ is measured and converted into a lens focus value.

Figure 1, right: O is closer than the converging point of the rangefinder images (F). Because of that, O reflects off the mirror B at a different angle than F; after bouncing off B, the reflected image appears in a different spot (O₂) than the direct image (F₁). This indicates to the photographer that the target object O is out of focus. The angle ɑ is no longer correct for the focusing distance O→B. To correct the focus, the photographer needs to change angle ɑ. Changing this angle consequently corrects the (coupled) lens’ focus value.

✱ — A is a prism/mirror combination to ensure that the reflected image is not flipped.

Other types of rangefinders.

While most film photographers will define a rangefinder as a camera with an optical rangefinder built-in, the same working principle and name apply to a whole range of devices.

A general definition of a rangefinder is a device that measures the distance from self to external object(s).

Optical rangefinders operate by measuring the angle (Figure 1: ɑ) required to converge the split image across its base. The rangefinder base is the distance between the two rangefinder windows (seen as B→A in Figure 1). The longer the base is, the more accurate the rangefinder could be made. This is why optical rangefinders used by the navy during WWII hand an immensely wide base length to help the soldiers accurately gauge the distance to an enemy ship.

Navy rangefinders’ immense base. Warships To-day, 1936. Wikimedia.

Sonar rangefinders operate differently. They measure the time it takes for an emitted sound wave to bounce back off an object at a distance. You may recognize this rangefinder from movie scenes with submarines, but did you know it was also used in Polaroid cameras to operate their autofocus? This is why a pre-2020 Polaroid camera with autofocus would show blurry pictures when you shoot through a window (because sound waves bounce off the glass and confuse the system).

Infrared rangefinders have also been used in film cameras since the ‘80s. But they were called autofocus devices. Today they are referred to as active autofocus devices — to differentiate from passive autofocus that works by calculating contrast levels in a digital image. Infrared rangefinders operate similarly to sonar, but they measure reflected light’s return delay instead of sound echo delay.

In general terms, any technology that determines the distance to your subject/object can be called a rangefinder. But when it comes to photography, the definition is a bit muddy.

Zeiss Ikon Ikonta front view.

Rangefinder vs Viewfinder — What’s the Difference?

Photographers’ definition of a rangefinder differs from the dictionary one. Even then, things get more confusing when you learn that a rangefinder camera contains a particular device within its body that’s called a rangefinder. The latter uses the dictionary definition of a “rangefinder” (the optical device), while the former is a photographer’s jargon referring to the entire camera body (a camera type).

An example of a simple viewfinder device that works like gun sight to frame your subject through the metal bracket. Heinrich Keßler: Die Photographie, GJG, Berlin 1914; S.140. Wikimedia.

A viewfinder is a device that tells you which parts of the world will be included in the picture and which parts will be cut off. A viewfinder is a device used for framing your scene. The simplest kind of a viewfinder is a square bracket on top of the camera that you can use like a gun sight to frame your subject.

The inevitable introduction of glass optics made viewfinders compact and more accurate. Eventually, manufacturers found a way to display the split-image rangefinder within a small patch inside the viewfinder window: a viewfinder/rangefinder combo — a standard on all modern rangefinder cameras.

This was not always the case, as rangefinder windows were first mounted as a separate eyepiece which you’d use exclusively for focusing. Then, once you’ve ensured your focus is correct, you’d have to look through another eyepiece (the viewfinder) to frame the scene.

Zeiss Ikon Ikonta rear (photographer’s) view.

Note that a combined rangefinder/viewfinder is not the same as a coupled rangefinder. The coupling refers to the rangefinder’s connection to the lens focus setting. For example, the rangefinder on the Zeiss Ikon Ikonta camera (pictured above) is coupled to the lens focus, but it is not combined with the viewfinder.

Rangefinders are typically integrated though sometimes they can be sold separately as an accessory. An accessory rangefinder device is always uncoupled since it is not connected to the lens. Its operation depends on you for reading its output and dialling it on the lens.

A brief history of the rangefinder camera.

Rangefinder cameras became popular at the beginning of the 20th century; the first camera to sport the device was Kodak 3A Autographic Special in 1916.

Contax II managed to combine the rangefinder and a viewfinder in 1936. Thanks to that invention, you no longer had to focus through a rangefinder eyepiece and frame the scene with a separate viewfinder eyepiece.

Kodak Ektra may be the first camera that introduced parallax compensation into its rangefinder/viewfinder eyepiece in 1941.

The rangefinder design eventually receded from stardom with the introduction of SLR cameras. SLRs changed how we photograph with their large, long lenses, close focus, and through-the-lens composition.

But the optical rangefinder never completely disappeared, even after digital cameras took over the photographer’s toolbox. Fujifilm, Leica, and others continue to produce digital rangefinder cameras that enjoy immense popularity.

Rangefinder cameras can have a compact, streamlined design. They don’t need a bump on the top plate to host an SLR prism. Some rangefinders, like the Vöigtlander Vitessas pictured here, had retractable lenses and could fit in a pocket.

The advantages of a rangefinder camera.

Rangefinders are lighter, quieter, and steadier than SLRs. A rangefinder does not require an SLR mirror to get out of the way while taking a photo, making it less prone to shake and easier to use with slow shutter speeds. Rangefinders can also be implemented with leaf shutter cameras or mirrorless digital cameras, making them exceptionally quiet.

Because there’s no SLR mirror between the film plane and the lens, rangefinder cameras can house lighter, more compact wide-angle glass.

Once you press the shutter button, an SLR camera will blackout the viewfinder while the shutter is open. This can be problematic when taking long exposures. A rangefinder camera would not have such an issue.

Yet another downside of an SLR is the slight delay that occurs while the mirror flips just before the shutter opens. However, this lag is usually negligible.

Most SLR cameras have a “bump” above the lens that houses their prism. A rangefinder, on the other hand, does not, making for a more compact/streamlined design.

Rangefinders can be brighter than SLRs. Since rangefinders/viewfinder combos do not rely on having to peer through the lens directly, they won’t dim when you mount a dark filter or shoot with a slow lens.

Some rangefinder cameras can show you what’s going on beyond the frame lines. Rangefinders with coverage greater than 100% will indicate where the scene will be cropped with frame lines while giving you additional visual context outside the frame.

Last but not least: everything is in focus while you look through a rangefinder, which can help you avoid composition mistakes and improve awareness.

The viewfinder’s position that is up and to the side of the lens creates parallax error when shooting up-close. If the parallax error is not corrected, the upper yellow lily flower framed to appear in the middle of the viewfinder image can get cut off on film. Note that the lens/viewfinder image views represent seeing through the eyepiece at the *back of the camera*. This diagram is an approximation.

The shortcommings of a rangefinder camera.

Parallax error occurs when the subject you thought fit perfectly in your rangefinder’s frame ends up higher and to the side of your picture-taking lens. This effect is pronounced when photographing close-up subjects but practically irrelevant for distances over 5m/16’.

Many rangefinder designs come with parallax-correction aids, such as travelling frame lines or a mask that shifts across the view as you focus. However, there’s a limit to their effectiveness, which is why most rangefinders will not focus closer than one metre or three feet.

Long, fisheye, and zoom lenses are impractical or impossible to use on analogue rangefinder cameras. The issue comes down to the angle of view that is difficult, impractical, or impossible to replicate with rangefinder optics.

While an SLR will give you an indication of what’s in/out of focus across the entire frame, a rangefinder will only let you focus on the center of the frame. This is rarely an issue unless you take close-up photographs on a tripod.

Working with a rangefinder requires greater trust in your gear. An SLR will render your scene through the eyepiece exactly how the camera lens “sees” it. It will paint focus, bokeh, magnification, and frame borders matching the film frame*. But a rangefinder will only approximate those things, leaving a lot up to your imagination and trust in your camera.

✱ — An SLR may crop your scene, so you may be seeing less than what you will be getting on film.

It’s much easier to forget to focus or take off a lens cap with a rangefinder camera than with an SLR. Also, if you’re taking a close-up portrait with your lens set to infinity, an SLR will make your mistake plain and easy to correct; a small rangefinder patch in the centre may not be enough of a reminder in a pinch.

A rangefinder will require calibration from time to time as it gradually drifts from the specifications. The most common symptom is the overlapping image not merging properly when focusing on infinity. Because of how universal this issue is across rangefinder designs, many manufacturers ensure that corrective adjustments are easy to make. However, some cameras, like the Voigtländer Vitessa A, are very difficult to calibrate.

Above, left: FED 5b, a Russian-made rangefinder with an interchangeable lens (reviewed here).

Above, right: Bolsey Model C, a US-made rangefinder/TLR combo camera (reviewed here).

Rangefinder design packages and features to choose from.

The majority of early rangefinders had small, uncomfortable eyepieces. They look nothing like the beautiful, bright LCD screens at the back of modern digital cameras. Peering through those peep-holes could be a challenge, especially if you wear glasses. Not to mention the tiny scratches you may accumulate on your spectacles after prolonged use with eyepieces that have nothing but metal around the lens.

But from around the 1960s-onwards, the eyepiece design began to improve gradually, particularly with higher-end cameras.

For beginner rangefinder users, I recommend looking for a coupled rangefinder, combined with the viewfinder eyepiece, and with parallax correction marks. Most of the rangefinders made after the 1960s fit this criterion.

Coverage is where rangefinder cameras shine. This property indicates the percentage of the scene shown in the viewfinder. Rangefinder/viewfinder cameras can have coverage larger than 100% that allows you to see parts of the world beyond the frame lines/parallax correction markings. This is not the case with parallax correction masks (see below).

Parallax correction markings vs. mask. Some cameras will have a thin, dashed, or a pair of lines near the top of the viewfinder. Those lines show you where the frame will be cut off when you’re shooting at the closest focusing distance. Vitessa rangefinder cameras implement a mask that travels with focus adjustments to ensure that the black edges in the viewfinder’s image appear in the same places as the film frame edges.

Some viewfinder/rangefinder combos feature frame lines that travel across the view instead of/together with a mask to help you correct parallax error.

Frame lines and markings inside your viewfinder may appear as simple lines drawn across the frame (appearing black), or they could be glowing. Some cameras use frosted glass windows to illuminate the frame lines. Illuminated frame lines are much easier to use in darker settings.

The magnification ratio indicates how large the image appears when looking through the viewfinder. The largest, most comfortable viewfinders have magnification ratios of around .75; smaller ones can go as low as .4.

Yor rangefinder’s effective base length is the distance between your rangefinder windows, multiplied by magnification ratio. A larger effective base length may help you focus with more precision.

 ☝︎ Further reading: “A Quick Guide to a Rangefinder’s Effective Base Length (EBL)” — 35mmc.

Some viewfinder and rangefinder cameras come with a dioptry adjustment wheel that can adjust the “prescription” of the eyepiece so that you may see the world through it clearly without glasses. However, I find this feature more troublesome than helpful; taking glasses on and off is another task and shooting with both eyes open is obviously not an option in this configuration.

Your viewfinder may also include information about exposure, multiple frame lines for various types of lenses, and other photographing aids.

Things to know when buying a rangefinder camera.

Besides being aware of the features rangefinder cameras can come with, you should ensure that yours is in good condition.

A good first question to ask is the rangefinder’s patch contrast level. Some cameras have their patch faded, making the task of focusing difficult or impossible. Unfortunately, there is no measurement for your rangefinder’s brightness, the best way to identify it is to ask an experienced, trusted seller. You should also know that fixing a faded rangefinder patch is very difficult.

You may also want to ensure that your rangefinder is calibrated/accurate. It’s very common for the overlapping image to get out of sync with the actual focus. Although, you may perform the adjustments yourself.

Just like your camera’s lens, rangefinder/viewfinder glass can get foggy, dirty, or covered with fungus. Naturally, none of these things are desirable.

How to adjust your rangefinder.

With a good set of micro screwdrivers and a bit of skill, you can fix alignment and accuracy issues in almost any rangefinder camera. If you do this bit of maintenance on your own, you can save some money and time.

Rangefinder misalignments are so common that many manufacturers ensured that adjustments could be made at home. However, you may need to perform light camera disassembly to adjust your rangefinder. If you are uncomfortable with this task, I recommend you spend some time learning and practicing this skill first or take your camera to a professional technician.

Note: You are performing all camera repairs at your own risk.

Rangefinder adjustments consist of infinity, scale, and close focus calibration. The calibration process involves gaining access to screws, twisting which would shift the overlapping image horizontally and, sometimes, vertically. Before you begin, you should search for a rangefinder adjustment guide for your camera that explains how to access the screws and which one is responsible for which action. The types of adjustments you’ll be making to your rangefinder and their effects are outlined below.

Infinity focus calibration is usually the easiest to perform. You’ll need to look through the rangefinder eyepiece and use a screwdriver to adjust the horizontal (and, sometimes, vertical) position of the overlapping image so that it merges for the objects at a far distance (30m+/100’+). Some rangefinders will only let you adjust the infinity focus.

Close focus calibration involves matching the overlapping image by twisting the screw(s) responsible for close focus adjustments on your camera. Only this time, you would be pointing your rangefinder patch over something at its closest focusing distance from your film plane. For example, if the closest your rangefinder can focus is 1m/3.3’, you should measure that distance from the back of the camera to a target object that you can see through the viewfinder. I use my computer screen with a clear image of a thin cross on a white background.

Like that of the notorious Vöigtlander Vitessa camera, some rangefinder designs involve a third calibration step. By adjusting its second mirror’s span distance (i.e. scale adjustment), you can fix issues like a perfectly calibrated infinity focus with an out-of-sync 1m focus (or vice-versa). Scale adjustment syncs up the travel distance of the overlapping image with the rotation angle of the first reflective mirror.

✪​ Note 1: Vitessa has another adjustment that can be performed on the rangefinder patch: overlapping image tilt. Most well-designed rangefinders will not make you go through this much trouble, however.

✪​ Note 2: You may need to calibrate infinity focus on your rangefinder with your lens if after the above adjustments you found your landscapes still appear blurry.

Focusing and composition techniques for rangefinder camera users.

My number one advice to myself and everyone else is to remember to take off the lens cap and to focus.

Mentally separating focusing and framing into two distinct steps is a good way to ensure you’ve got everything lined up before taking a picture.

Having both eyes open while focusing may also be helpful. This can make the rangefinder patch look a little more contrasty and reduce the strain on facial muscles.

If your subject is moving towards you, you can use your rangefinder to focus on the spot you anticipate them to cross. This way, you can ensure that the only thing you need to do when the moment is right is to press the shutter button. I’ve heard someone refer to this technique as collision path focusing, which seems fitting.

Focus with your body & feet. If you set the desired focus distance you’d like to photograph your subject from, you can move around while looking at the rangefinder patch and click the shutter as soon as the overlaying images merge.

Leave some cropping room when framing your scene. It’s better to step back a bit and crop the image later than to lose an important part of your scene because of the parallax error.

Keep the depth of field in mind when photographing with a rangefinder camera. The view through the viewfinder will leave everything in focus, but a wide enough aperture is likely to blur some parts of your scene. Using your depth of field calculator, you can ensure that all the right parts stay in focus.

F/8 and be there! Zone focusing is estimating the distance to your subject and dialling it onto your lens directly. Sometimes, it’s the best way.

 ☝︎ Further reading:How to Zone Focus Quickly and Accurately — For Fast Action, Night Photography, and Specialty Cameras.”

This photograph isn’t staged, which means that I had to focus and take the shot at a moment’s notice — a task perfectly suited for my sixty-year-old Vöigtlander Vitessa A rangefinder camera.

By the way: Please consider making your film-related purchase using the links above  so that this website may get a small percentage of that sale — at no extra charge for you — thanks!

I hope you found this guide helpful. For more rangefinder design examples, feel free to look around the camera/lens review section of this website. And don’t hesitate to contact me if you have any questions, comments or corrections!