How to Store & Organize Film & Film Scans

7 min read by

Now that you’ve got a few rolls (or maybe thousands) of film exposed, developed, and scanned, there needs to be a reliable system to store your work safely. Even if you didn’t love the results, you or your family might wish to revisit them later.

This short article explains a tried and tested way to index and organize your negatives and film scans. It is quick, easy, and effective.

Now is the best time to start.

I’ve been shooting film for a little longer than ten years. I started slowly — exposing a roll every few months — which has now transformed into an obsession, with some months yielding 12 or more rolls. I understand that you may have even greater volume, as certain gigs and events require that.

It may seem daunting to implement a system — however simple it may seem — across all your present and previous work. Thankfully, that’s not necessary. I have heaps of family photos, my early work, and some recent stuff that’s set aside. It’s in boxes and isn’t well-organized. At most, I can tell the decade those images were shot in.

But the archived images I feel the most need to revisit were shot during the past five years (which I would consider my best work anyways) and the organization system I’m about to introduce has made finding and re-scanning (if necessary) those photos significantly easier.

Even if today was the first day I began organizing my work, I’m already improving my archive. I still don’t have the time to go through the old, dusty negatives and darkroom prints from my parents’ and grandparents’ old stacks. Some of it got scanned and placed in less-definitive folders, named the 1980s, the 1990s, etc. This works fine — but for the newer stuff, I use a little more structure.

PrintFile binder negative sleeves with 35mm film. I label the beginning of each film roll and the top of a page with masking tape, marked with the date, the film, and the camera.

How to store and organize physical film negatives.

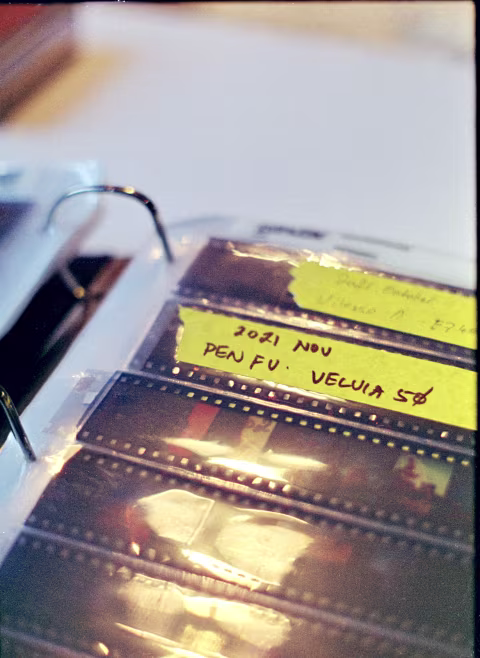
The best way to store and organize physical film negatives (and slide film) is in a thick binder with PrintFile negative sleeves or something similar.

Flipping through a binder of labelled film sleeves is much easier than through a box of loose pages and various film storage methods (I have a box with prints, film rolled into plastic film containers, and loose PrintFile sheets — very unhelpful).

Note: For best results, I suggest you commit to sleeving all your newly developed film into binder-friendly plastic sheets. You may need to re-sleeve the film you get from your lab — which I assure you is worth the effort.

The principle is simple:

1) Sleeve your film into PrintFile sheets and start adding those sheets into a large binder.

2) Label your PrintFile sheets with your film’s date: year, month, the camera it’s been shot in, film brand, and exposure.

I use the dates the film was developed as the exposure times can vary and stretch across months. The expectation is, then, that the film was exposed the month or one month back from the label’s date.

For exposure, I use the film speed ISO (i.e., Kodak Portra 800); if I’m pushing or pulling film, I note that too.

3) Do the same for your film scans (more on that below).

You may label your binder at any time with whatever you like. Thus far, it has taken me nearly five years to fill mine, so there probably won’t be many of these in your home. A library or an institution with thousands of film negatives would have to consider a folder naming system.

#2 is a little tricky. PrintFile sheets are made to fit five frames per line for a total of 7 lines per sleeve, totalling 35 frames per page. This is an inconvenience as most 35mm film rolls fit 36 exposures, which can sometimes be stretched to 40+ on some cameras.

The best way to deal with this issue is to ignore the pages and sleeve film rolls continuously while adding labels to each roll with masking tape and a sharpie. (The PrintFile labelling area isn’t that helpful anyways, as the writing can easily get smudged on a slippery plastic surface.) Those labels must be applied at the start of every new roll and at the top of every new page. And since all your pages are bound, you won’t get confused later; plus, there’s no wasted plastic. It’s like labelling chapters in a book. (The label at the top of every new page will help you if the pages get separated for some reason in the future.)

This approach works well for all roll film sizes (you must have a matching PrintFile sleeve size). You may need to start a new page if you’re shooting mixed formats. But I don’t recommend separating your formats by folders as the core principle of the organizational system here is dates.

How to store digital film scans.

Your folders of scans should work as an index for all the film you’ve stored in your binder(s). If you need to re-scan or inspect your film, you may find it in your folder of scans first, from where you can follow the date, the camera, and the film to find it in your folder.

Organizing film scans by pattern: » YYYY » MM (Month) » Camera -- Film » Image Files. I separate my image files into negatives and positives here but that’s optional — you can simply have all your scans there, however named or unnamed.

Film has an advantage over digital files when it comes to coming up with organizational patterns on your drives. There are 36 frames per roll (or about a dozen in medium format) that are typically shot in the same camera and on the same film. This relationship makes sense for those groups of scans to end up in a folder, which makes browsing significantly easier than scrolling through thousands of unnested files.

And so the naming and nesting system that I use for digital scan storage is » YYYY » MM (Month) » Camera -- Film » Image Files. Where » indicates a folder.

The negatives/positives separate folders are necessary for the digital negatives scanning and storage method — discussed in the linked article. This is optional. You may also abbreviate your years and months differently, but I strongly suggest keeping the folder nesting structure the same.

Of course, you may append a name or description to your file names or metadata. I’m simply not creative enough to do that for every image when I am archiving them.

The frame index numbers or even names aren’t particularly important. Given that you’ll at most have 40 (or 78 for half-frame cameras) per folder, it won’t take long to preview all to find the one you’re looking for.

Film Log app interface.

Remember and track film from an exposure to the archive with Film Log.

If you use more than one camera or take a few days to expose your roll, you may forget what’s inside your camera(s) and what is it you got back from the lab. This may make the job of naming and categorizing your archived film and film scans difficult.

Film Log is an app that helps noting what film’s in which camera quick and simple and it maintains that data for you. It’s free and comes with many related, community-proven features.

Backup.

Your binders with the organized, developed film are your ultimate backup and master copies. However, if something were to happen to your digital scans, it would be trouble re-scanning all your work.

As someone who has worked with computers professionally for 2+ decades, I assure you that hard drive failure or file corruption is almost guaranteed to happen in the long run. It may take years before you see any issues, but when it happens, it could be a dramatic letdown.

I recommend either backing up duplicates onto a second hard drive or using a service like Dropbox to store your images on their servers.

✪​ Note: Dropbox costs slightly more than the similar Apple and Google services, though I found it noticeably better at managing files on the cloud (fewer bugs and smoother overall experience). However, there are tons of solutions out there that can do similar things, some of which are free.


Feel free to use this system as a starting point for your own archival design. There are no musts here — only suggestions based on long-term experience. And if you have advice or suggestions, please consider sharing them below to help the next reader. Thanks!