How to Load a 35mm Film Camera

Everything You Need to Know to Start Shooting Your First Roll of 35mm Film

10 min read by Dmitri ☕️.

If you’re just starting your film photography journey — whether a seasoned digital shooter or a newbie to the camera world — this short guide will help you hit the ground running.

Download this guide for your reference and better viewing.

This guide has a lot of illustrations with fine text. If you are viewing this on your mobile device, it’s better to download it as a PDF with full-resolution images. You can also print the download and view it while offline.

 Free Download: How to Load a 35mm Film Camera (PDF)

You will be asked to sign up for a free account with Analog.Cafe. It comes with access to more downloadable guides, additional website features, and a monthly community newsletter.

How to tell if I have a 35mm film camera?

Film photography has an abundance of formats (film sizes). Some of the most common ones are 110, APS, 135, 620, 220, 120, 4x5, and 8x12.

135, also known as 35mm, is the most popular film type. Your first analogue camera is most likely to take 35mm film.

Figure 1. The back of a 35mm film camera. When opened, it reveals a film canister chamber, guide rails, and a take-up spool.

35mm film cameras are usually no larger than a typical DSLR, although some may come in pocketable sizes.

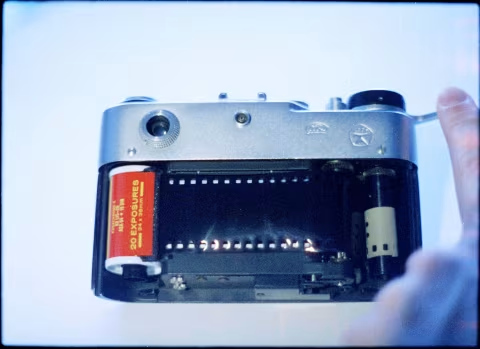
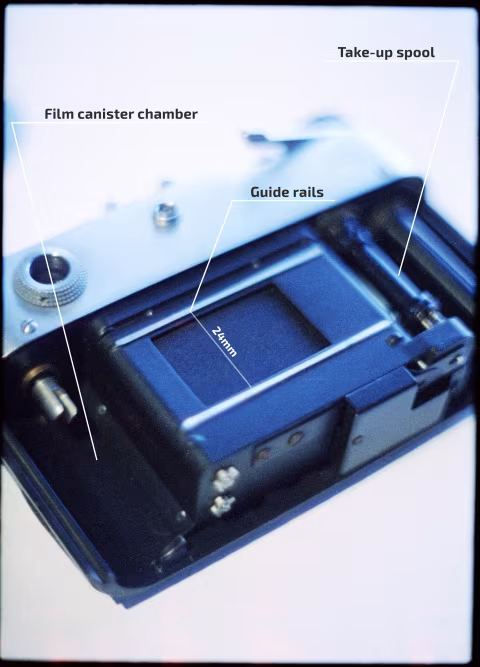
All 35mm cameras will have a film door or a back cover that you can take off. Inside you’ll usually see guide rails, a take-up spool for your film, and a chamber for your film canister. If your 35mm film canister fits in the chamber — you have a 35mm film camera.

If you don’t have a 35mm film to see if it fits in your camera, you can measure the distance between the guide rails with a ruler. If it’s around 24mm or .94 inches, you have a 35mm film camera.

But before you open up the back of your camera, you should first check if you have film inside.

✪​ Note: 35mm in 35mm film refers to the full width of a film strip — including the perforations on both sides, whereas 24mm is the width of a film frame. A typical film frame area is 24×36mm — this size is referred to as “full-frame” in both film and digital photography. Most 35mm film canisters will yield 36 frames, although some may give you just 24.

How to check if there’s film in a camera?

There can still be film in your camera from a previous owner. You may want to save it to see what’s on it later. This is how to do that.

Film cameras made in the ‘90s and ‘00s sometimes have a small window on their back where you could see whether there’s film inside. They would look dark and empty if there’s none.

If your camera does not have a window at the back, you could also check the film counter — it will show a number between 1 and 36. If it’s at “2” or more, you have film in your camera. Note that some older cameras have a tricky way of displaying those numbers.

Another way to test if there’s film in the camera is to try advancing it by one frame and taking a picture. You will feel some resistance, and the frame counter will increment by one. Or you could try rewinding to see if there’s any resistance.

Figure 2. Film cameras with their film covers/doors open.

How to open my film camera’s back?

If you find that there’s film in your camera, make sure you rewind it before opening your camera’s back. Even if you don’t want to keep the old roll, it needs to be rewound to be taken safely.

There’ve been a lot of film cameras made for 35mm film since 1934. They are all a little different, but when it comes to opening them up to load fresh film there are just two types of doors/covers and three types of locking mechanisms that hold them in place.

Figure 3. The bottom of a camera with a film cover.

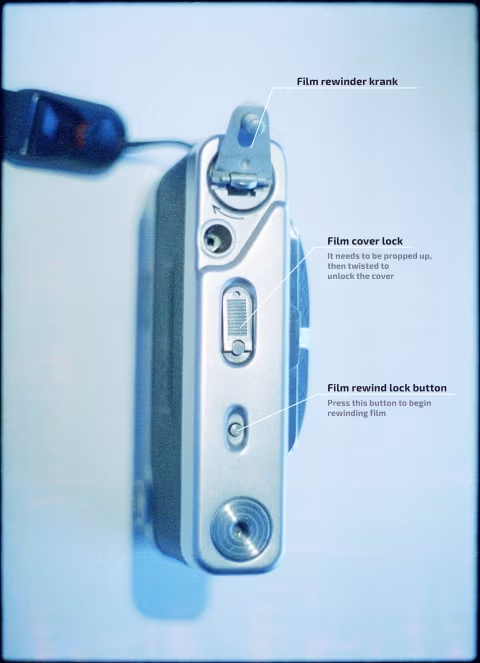
Film doors stay attached to the camera bodies via hinges. To open a camera with a film door, look for a latch on the (typically left) side. If you pull it, the door should pop open. If there’s no latch, see if you can unfold and pull on the film rewinder crank. And in some rare cases, you may need to look for a door lock on the bottom of the camera that would typically consist of a lock or a pair of locks that can be twisted open.

Film covers are detachable backs that keep the film secure inside your camera and away from outside light. They could be slid down and off your camera after being unlocked at the bottom of the camera.

Once you’re done loading film, film doors can usually be shut closed. Film covers will need to be slid back on and locked manually.

You may need to be a little creative with searching for the right way to get your cover/door unlocked with your first camera. Just make sure you don’t apply too much force; it shouldn’t take more power than pulling your home’s door handle.

Figure 4. Loading film into a film camera. On the left, an old mechanical camera requires fastening film to the film take-up spool and advancing it by one frame (or more). On the right, a more modern camera is much easier to load: the film canister is inserted into its chamber and the film leader is aligned to the orange arrow.

How to load 35mm film into my camera?

If you have a relatively modern film camera with motorized film advance (the kind that takes batteries and winds film automatically) film loading is easy. You’ll need to first insert your 35mm canister into the chamber inside the camera so that the film lies flat on top of the guide rails. Next, pull the film leader to align it with the arrow — so that the tip of it is touching the other side. Then close the cover, and your camera should do the rest.

✪​ Note: Some examples of motorized film advance cameras reviewed on this website are Minolta TC-1, Olympus Infinity Stylus, Olympus Stylus Epic, Olympus L-10, Olympus Infinity Zoom 80, Rollei Prego 100WA, Pentax Espio 100V, and Ricoh YF-20.

Older mechanical film cameras will take a bit more work. First, you will need to fasten your film leader tip to the take-up spool. This means pushing it inside the spool’s slit, spool’s opening, or a spool’s clamp until it’s snug. Other times, you may need to thread your film leader through and across the spool.

Next, hold/press the film leader gently and securely against the take-up spool and pull the film canister so that it can reach the other side and insert it into the chamber. Finally, advance your film by one or two frames with your camera’s film winder — you may need to press the shutter button between each advance to unlock the winder.

Once your film lays flat on the guide rails and appears to be securely attached to the take-up spool, you may close the film door/cover.

Finally, advance your film by one more frame so that you have a fresh, unexposed piece of film behind your lens.

Some cameras, like the older Leicas and FED, will have removable film take-up spools. See this article on how to do that.

How to check if the film is loaded correctly?

One of the worst feelings in the world is having wasted 36 frames shooting blanks. This could happen when the take-up spool does not catch your film leader properly.

If you have a camera with a motorized film transport, it will typically indicate an error and not increment the frame number as you take pictures if the film wasn’t loaded properly. In that case, you should open it and try to pull the film leader a little further towards and into the take-up spool chamber.

The best way to check if the film was loaded properly on a manual film camera is to watch the film rewinder crank rotate as you advance to the next frame. The principle is simple: if the take-up spool caught the film properly, the rewinder crank that’s connected to the film canister’s spool should rotate as well. Note that film can sometimes be loosely wound inside the canister, and the rewinder crank may not begin to rotate until after you advance two to three frames.

Some rewinder cranks will disconnect from the take-up spool after you fold them and will not rotate — as is the case with Voigtländer Vitessa A cameras. They will, however, show a part of the take-up spool if you unfold the rewinder.

You could also try the film advance lever before loading the film and compare the feel of the resistance to the one after you load the film: there should be a noticeable increase in drag.

If you find that the film isn’t loaded properly, you’ll have to open your camera’s back and check. A good way to ensure that the film leader is fastened securely to the take-up spool is to advance it a few frames while the back is still open. Of course, you will waste a couple of frames, which is a small price to pay for losing all the photos you’d take when the film isn’t properly loaded.

How to rewind film?

Film cameras with motorized film transport will rewind film for you automatically. If you want to rewind it early, look for a small button with a rewind symbol (you will need a pin to press it).

Manual film cameras typically have a mechanism that locks the rewinder crank to prevent double-exposures. To unlock it, look for a small round button on the bottom plate (see example in Figure 3). Some cameras will have you press it once, while others will require you to hold it down as you rewind the film. Once you’ve engaged the unlock button, use the film rewinder crank to start pulling the film back into the canister.

Rewinding film manually may take a little while. At some point, you will feel the film pop out of the take-up spool and rotating your rewinder cranks will become a lot easier. At this point, it’s safe to open the camera’s film door/cover and extract your 35mm film canister.

✪​ Note: Your camera’s back should always stay closed while you rewind the film. Never open your camera unless you’re loading film or removing the used film canister.

Where can I develop my film?

Once you’ve got your film out of the camera, it’s time to develop it so that you can see the pictures you took! While you could do this at home, most beginner film photographers send theirs to a local film lab.

You should expect your lab to return your film within a couple of weeks (some labs can do the job within hours). Labs will typically ask you for the quality level of the film scans which will be your digital versions of the film photographs that you can share and print. I have a guide that should help you with that decision here.

Some labs will be able to print your film pictures without having to scan anything.

If you’re in Vancouver, Canada or Chiang Mai, Thailand, I’ve got detailed reviews of the labs in those cities. Otherwise, you can search for a film lab and your city’s name online. Alternatively, you may look for labs that do online film processing by mail.

Remember to always request your negatives back — unless they all came out blank. Your film negatives are the original photographs that contain all the image data. No film scanner can get 100% of all there’s in a negative, and without a negative you can not print in a darkroom — which is a process of completely-analogue image-making.

 ☝︎ Further reading:A Beginner’s Guide to Shooting Manual Film Cameras.”