Are TIFF Scans Worth It?
10 min read by Dmitri.Published on . Updated on .
TIFF files are much larger than JPEGs. They often cost more if you scan your film at a lab. But are they worth all that extra storage and dollars?
Despite being a common option and an established format, even savvy photographers often misunderstand the technicalities of image bitrate, containerization, and compression. I dealt with dozens of image delivery and manipulation implementations in the past twenty years as a software engineer; my latest project is the save-as-TIFF option in film Q, a web app that batch-inverts film negatives with one-button operation.
If you’re looking for a quick answer, I won’t bore you with details. This decision tree will help you pick your format quickly.
But if you’d like to learn about the common storage and encoding options, how they work, and how to take a better advantage of them, keep reading: this guide has the answers!
In this guide: JPEG or TIFF? Decision tree. 8-bit vs. 16-bit vs. 48-bit vs. 64-bit. Best settings for JPEG scans. Best settings for TIFF scans. TIFF vs. RAW. Storage considerations. Support this blog & get premium features with GOLD memberships!
JPEG or TIFF? Decision tree.
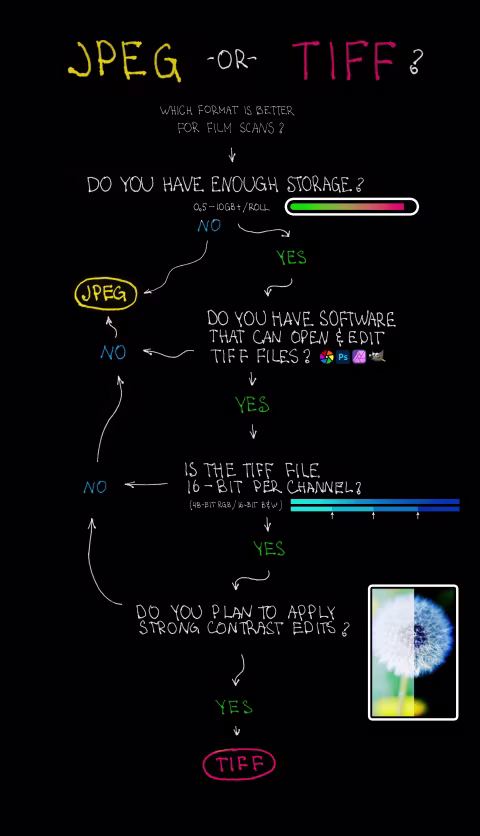
Depending on how your TIFF files are compressed, their resolution, and their bit depth, they could occupy between 500MB and 10GB per roll.
There are several apps that can open and edit TIFF files, but you can’t upload them to social media apps, they are too big for email, and they can drain your device/computer’s memory.
Not all TIFF files are 16-bit per channel. The bitrate depends on the scanning device and how the file is saved. Bitrate is easy to reduce but impossible to fully restore. You can verify the bitrate of your TIFF file when you open it in your editor (in Photoshop, you can find this info in the menu Image > Mode).
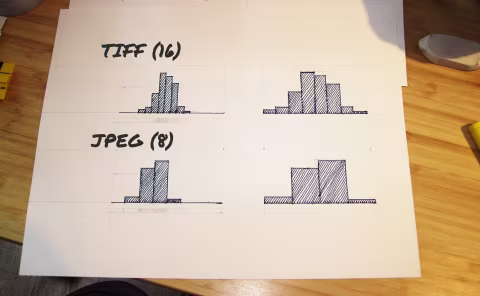
Though 8 bits per channel is sufficient for viewing and common editing tasks, 16-bit encoding leaves more flexibility for edits that may affect the contrast. Histogram stretching is an example of such an edit, as are severe adjustments to saturation, brightness, colour balance, hue, and contrast. If you think your film roll may have exposure mistakes that need fixing, complex light, or your film has a strong base fog (this usually happens to expired film), 16 bits may yield better results in the end.
8-bit vs. 16-bit vs. 48-bit vs. 64-bit.
Bit depth or colour depth describes the total number of shades an individual pixel can have.
Computers can store two values in a single bit, which can mean either black or white. Two bits can store 2² = 4 colours, four bits can store 16 colours, ...skipping a few…, eight bits can store 2⁸ = 256 colours, and 16 bits gives an enormous range of 65,536 colours per pixel!
But there’s more. The 16-bit systems store 65,536 colours per channel, which means that for full colour, which is made up of three channels, red, green, and blue, we’re using 16 × 3 = 48 bits total. That’s 281,474,976,710,656 RGB colours per pixel!
By comparison, the human eye can see about 1,000,000 colours (approximately 6.65 bits), whereas an iPhone uses its 6-bit-per-channel display to show 262,144 RGB colours.
So why would anyone want to store images with 16-bit per channel colour depth if we can’t display or see all of it?
Tasks such as scanning and inverting film negatives can cut the total number of colours in an image by a large margin. Plus, every consequent step, such as lossy image compression, contrast adjustments, and destructive edits, may decrease the recorded depth even further. A 16-bit system ensures that such significant changes can be made without noticeably degrading image quality.
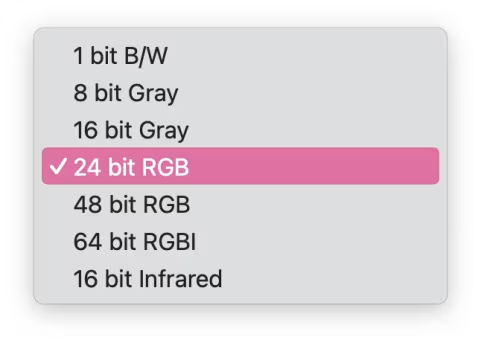
If you use film scanning software such as VueScan, you may notice that it lists the bitrate as a total for all channels. For example, its “24 bit RGB” option implies that the image will be 8 bits per channel. The “48 bit RGB” setting is equivalent to 16 bits per channel.
However, 64-bit RGBI means something else. Here, the software will encode a 16-bit per channel image in RGB with an additional infrared (I) channel that some software can use to remove dust and scratches with various levels of success.
Below, I’ll mention a few other bitrates, such as 10, 12, and 14 bits per channel, which you’d typically encounter in a camera RAW file.
Best settings for JPEG scans.
Inverting film scans requires significant changes to contrast levels, especially if it’s colour-negative film. This is why the best scanners produce 16-bit colour depth, and camera RAW files will also store higher bitrates than JPEGs (which is intended for digital photo processing but is also helpful for our use case).
However, successful image inversions will often discard some of the inbound dynamic range, so 8-bit JPEG positives are generally sufficient for most editing tasks, even print, provided that optimal compression settings are selected and the inversion was done in the 16-bit (before downsampling to JPEG).
JPEG compression quality ranges from 0 to 100. Zero is not suitable for film scans as it affects the image quality significantly in order to create the smallest file possible. Compression quality of 60 usually creates images with barely visible or invisible artifacts, whereas higher compression qualities will not have visible artifacts unless you enlarge the image significantly or look for specific saturated colours.
JPEG chroma subsampling is a compression setting aimed specifically at colour. For colour-negative film scans, this option can be especially important as good scans can store a large variation of colours, especially for high-saturation films like Kodak Ektar.
4:4:4 is the highest chroma subsampling quality setting, which keeps the colours intact. Unfortunately, most apps, including VueScan and Adobe Photoshop, do not offer this control. They may or may not resample image colour using lower values (most likely, 4:2:2 or 4:2:0).
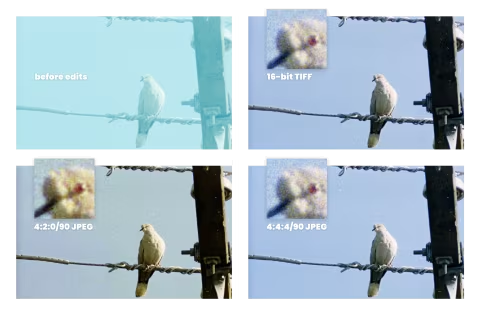
film Q inverts film negatives into JPEGs with 4:4:4 chroma subsampling and a compression level of 90. These settings ensure colour fidelity and editorial flexibility that’s close to uncompressed 16-bit TIFF files.
Best settings for TIFF scans.
TIFF format’s advantages are its compatibility and compatibility with 16-bit colour depth. TIFFs can be opened with advanced image editing tools and behave exactly the same across systems, whereas their higher bitrate helps avoid banding and lost details. High-quality, high-bitrate uncompressed images have the greatest editorial flexibility and store the finest grain detail.
However, TIFF files alone do not guarantee image quality. Virtually all image files have a “core” made of the image data and a container that encapsulates the image data along with other pieces of information. Thus, it’s possible to receive a low-quality 8-bit high-compression JPEG image encapsulated in a TIFF file.
TIFF files can store lossily-encoded JPEG data, either as an 8-bit or a 16-bit JPEG 2000. The latter encoding may not work with some apps, although it may store more image data. Similarly, TIFF files may contain WebP-encoded images, which have a similar capacity for data retention as JPEG 2000 but less compatibility across apps.
Lossy encodings may retain sufficient data for various edits, display, and print — depending on the settings used. For example, the 4:4:4/90 JPEG example (see the illustration above) is barely distinguishable from TIFF. However, these types of encoding gradually degrade as you apply multiple rounds of destructive changes to the same file (i.e., edit, save, reopen, edit, save, reopen, etc.)
Lossless encoding schemas will not degrade as much or at all during transfer and encoding/decoding. However, losslessly encoded TIFF files can be a lot larger.
Deflate (ZIP) is the most efficient and effective compression schema for photography, particularly film photography. This algorithm is widely supported and free to use.
film Q saves TIFF files using the Deflate compression schema. If you are working with photography, you should choose this option whenever available.
Some applications may give you a choice of Deflate predictors: 1 (none), 2 (horizontal), and 3 (float). Predictor 2 (horizontal) is preferred for photography as it yields smaller files while carrying the same amount of data. Predictor 3 (float) may include additional data for scientific uses and has no significant advantage for size or quality of images. film Q uses the horizontal predictor.
More examples of TIFF compression schemas: LZW (Lempel-Ziv-Welch) —a standard developed in the 1980s that uses a relatively simple algorithm. However, it’s not ideal for our use as this technique relies on repetitive data, which is uncommon in quality film scans. PackBits is another compression algorithm optimized for repetitive data, which is still not ideal for our uses. You may even come across archaic options, such as CCITT Group 4 — a compression schema developed for fax machines and Zstandard — a faster version of Deflate with limited compatibility beyond Linux systems.
TIFF vs. RAW.
TIFF files are different from camera RAW formats in several ways:
TIFF files contain an image that you can open and display using common software like macOS Preview and Windows Photo Viewer. However, camera RAW formats are numerous; RAW formats require specialized software for opening and additional input for converting the underlying data into a viewable image.
Camera RAW files aren’t necessarily compatible with the software made for the job, and even if your app can open such a file, you are not guaranteed to get correct or expected colours out of that file.
This is why the colours you get from your RAW files can change depending on the software you use to open them and a “profile” or set of rules that software uses to interpret the sensor data.
Oddly enough, RAW formats such as DNG can contain a TIFF image. Those kinds of files behave exactly like TIFF but can be opened with several apps built for reading RAW formats.
Virtually all image files have a “core” made of the image data and a container that encapsulates the image data along with other pieces of information. In case of the DNG file that contains a TIFF image, DNG is the container format, and TIFF is the target data. The same DNG container may hold camera RAW data, which, as mentioned above, is not an image but a dataset from the sensor that needs additional input to become an image.
RAW files are typically smaller than TIFF files. Since the RAW files contain “naked” sensor data, often in bitrates lower than 16-bit, they can take up less space than TIFF files that contain a rendered image. The advantage of a larger TIFF file is that the image data is “locked in” and will not change regardless of the software that opens it, whereas RAW files may look different depending on how they are decoded and which software opened them.
However, if the RAW file format, such as DNG, contains a TIFF image, it will not be smaller than the same TIFF image saved as a FILE.TIFF.
Storage considerations.
In general, photos don’t need to be stored as RAW or 16-bit TIFF files unless you plan to alter their colours drastically or encode and decode them several times.
Unedited/non-inverted film scans (a.k.a. digital negatives) are up for drastic colour changes during the inversion process, and thus they can benefit from lossless compression and 16-bit colour. Camera RAW files have similar flexibility built in with their 10+ bit colour depth. However, once the edits to the scan are complete, there’s no need for high bitrate.
My practice for the past five years has been storing losslessly compressed 16-bit TIFF scans (i.e., digital negatives) and their inverted versions as JPEGs locally and in Dropbox. The original TIFF scans are the archive, while the inverted JPEGs are the images I work with and share.
So far, my archive, which includes my family slides from the 1980s and personal scans that date back to 2011, is 1.94 terrabytes.