How to Manually Invert Film Negatives
An Introduction to Histogram Stretching (Normalization)
11 min read by Dmitri.Published on . Updated on .
Histogram stretching (in image processing: normalization) is a simple, time-proven technique for inverting film negatives.
I’ve been using this technique with my scans for several years; most of the photos you’ll see on Analog.Cafe have been processed that way.
In this guide, I’ll explain the principle behind this method, how and why it works, how to apply it to your workflow, as well as its advantages and disadvantages.
In this guide: Why is inverting film negatives so hard? What is histogram stretching? How to manually invert film negatives using histogram stretching. How to automatically invert film negatives with histogram stretching. Colour adjustments may be required. Histogram stretching for positives. The drawbacks of histogram stretching. Does histogram stretching cancel the effect of colour filters? Support this blog & get premium features with GOLD memberships!
Why is inverting film negatives so hard?
Inverting film negatives involves more work than simply turning whites to blacks and greens to reds. Film, particularly colour-negative film, uses colour masks and comes with base fog, which obscures the image within.
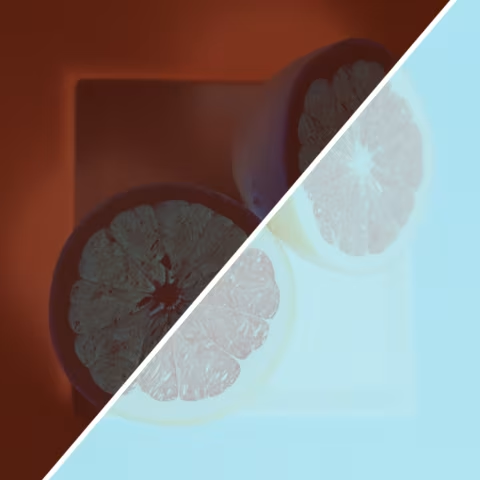
If you were to simply invert a film scan without correcting for those built-in filters, your image would look washed-out and show strong colour shifts that may be difficult or impossible to correct by simply adjusting the colour balance.
Darkroom printers overcome the above issues by inverting the colours using specially developed paper chemicals tuned for the task. Base fog is overcome by adjusting exposure while the chemical negative process (like RA-4) partially negates colour casts. Unfortunately, there’s no direct alternative in the digital colour space.
Scanning and film inversion software designers use various approaches to solve this challenge. One such approach has been to model the response of photochemical paper by analyzing various film stocks and creating bespoke filters for each product. The downside to this approach, aside from the complexity and the work involved in creating such algorithms, is that new film stocks launch every year, and even legacy films change how they respond to light from batch to batch and over time as they expire. Even the way the light falls onto the film, the scanner hardware (including the backlight), and your exposure settings at the time of picture-taking can derail this method. And what about pushing and pulling film, experimenting with alternative chemistry, or fixing mistakes during development?
The result is often software with an outdated list of film stocks and a false promise of a final image straight from the scanner, which, in the best case, requires colour correction and, in the worst case, ruins the scan with unique new films such as Harman Phoenix and Kodak Aerocolor IV.
Another approach is sampling the film base and using that data to “subtract” the mask and base fog colours from the final image. This method is much simpler than modelling film response, and it works with any film stock. However, the quality of your sample will affect your results, and this method will not account for various densities across multiple frames, which can yield a set of inadequate scans along with good ones on the same roll. Plus, if your scanner crops your film to just the exposed area, this method will not be possible to perform.
Histogram stretching, a.k.a normalization, is a third method that does not rely on flawed models or having to sample specific areas of your film. It adapts to the colours within each exposure and is easy to perform.
What is histogram stretching?
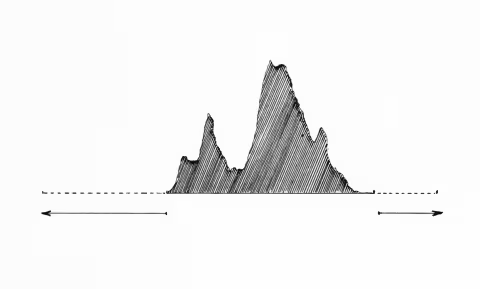
Histogram stretching is a technique that sets the black-and-white points of an image to their respective maximum values. In image processing, this technique has a name: normalization.
Consider why printed photographs fade over time: the dyes become less opaque or change colour from black to grey. We can fix this problem in the digital colour space by resetting the black point, essentially assigning black to the darkest grey and recalculating the rest of the values. This is an easy task with modern image editors.
The other reason images may appear faded is because the brightest areas are no longer white — dirt and staining can make a photo look a lot duller than it used to be. This can be fixed the same way, just on the opposite side of the spectrum, by resetting the white point.
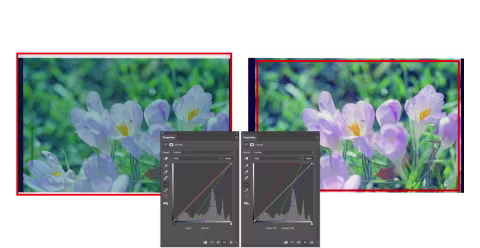
Resetting the black and white points can fix your monochrome negative scans perfectly, but there’s nuance when applying this method to colour-negative scans.
To fix colour shifts, histogram stretching should be applied separately to each colour channel. By doing so, we are virtually subtracting the orange (or any colour) mask and base fog from the image — but unlike literally sampling and subtracting that colour, we are using the data that defines the image and not the film base.
How to manually invert film negatives using histogram stretching.
Your software must have a way to invert colours and adjust the histogram or curves for this to work. Most advanced image editors have those features, i.e., Photoshop, Gimp (free), Dark Table (free), Affinity, etc.
There are just two steps:
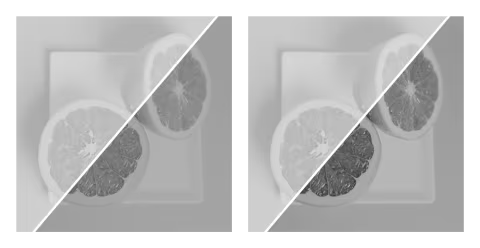
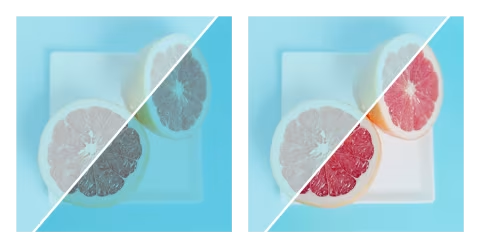
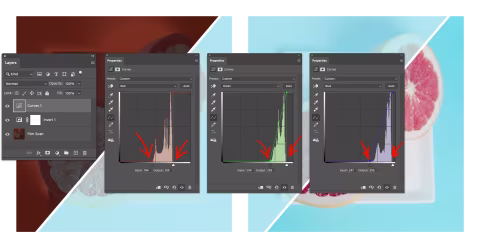
1) Invert the colours.
2) Edit the histogram or curves for each colour channel (R, G, B) so that the ends of your histogram match the min/max values. The graphic at the top of this article illustrates this step as broadly applied to all image editors.
Example settings in Adobe Photoshop:
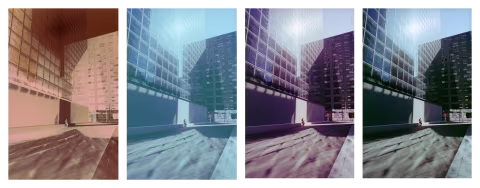
How to automatically invert film negatives with histogram stretching.
Automating histogram stretching can be done with software that can analyze the scan (in the Photoshop example above, the histogram graphics are the visual representation of such analysis) and recalculate the values of the image accordingly.
I suspect that some film inversion apps work in a similar fashion, but it’s hard to tell for sure because most do not reveal the workings of their algorithms. The unfortunate result of that is a photographer who doesn’t know what has been done to their scanned negative. This makes comparing film stocks and understanding the results of different exposures, colour filters, and film brands unreliable.
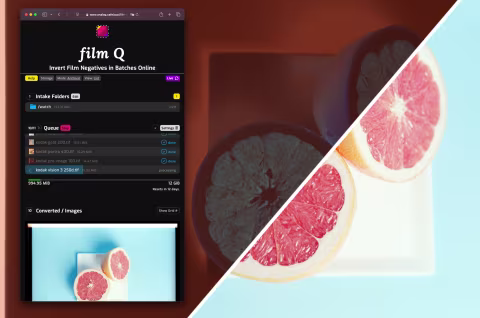
film Q is a new film inversion tool that automates the histogram stretching process. It does just that across various file formats in batches of up to 100+. film Q is free for Analog.Cafe GOLD members. Learn more.
Colour adjustments may be required.
While histogram stretching can successfully remove colour shifts and base fog from film scans, it will not modify colour balance, contrast, or saturation across individual bands of intensities. In other words, you may need to fine-tune your images after you’ve normalized your image.
In reality, you may need to adjust your colours even if the software that inverts your scans claims that its inversion step is the only thing you’ll need to do. The colours of film negatives have always had to be interpreted, which includes darkroom prints where the technician creates several test strips with various colour filter adjustments and picks the best settings for the final image.
The orange mask is partially at fault here: there are no standards for its intensity or hue. It was designed as a tool to make high-quality print colours possible without rare or expensive chemicals. But that’s not the only reason colours have to be adjusted for scans, as recreating images in a new medium always requires image interpretation; consider the differences in ink levels needed to print an image on a glossy vs rag vs canvas vs metal vs glass. While there are colour calibration processes out there that automate this, such automation is not feasible for an ever-changing medium (film) and the tools that scan it.
Learn more about scanning film “without changing its look.”
Learn about colour-correcting film scans.
Histogram stretching for positives.
Histogram stretching removes colour casts and base fog from scanned film negatives — but it can also be helpful with slide film.
Slide film’s advantage is that the colours have already been interpreted by the chemicals within the base once it’s developed. Its clear base isn’t 100% transparent, but the fog is minimal, and it diminishes with a brighter backlight. However, if the slides are expired, colour shifts may appear, and the base fog can become more difficult to manage.
Histogram stretching can be used to solve these problems quickly and restore the initial colours without making changes to colour balance or saturation.

The drawbacks of histogram stretching.
Histogram stretching works well for the vast majority of images, particularly film scans. I’ve had much better luck using this method than other scanning solutions, and it’s significantly better at interpreting films with unusual film base colours. It works with all types of negative film — but it struggles in a specific set of conditions:
If the intended image has an implied colour gamut that’s larger than encoded.
Examples of such problem images include photos of the clear blue sky (with nothing in it) and some sunset photos.
In the case of clear blue sky, the issue is that there are no clear minimum or maximum values for any of the colour channels. The lightest blue and darkest blue appear nearly the same in the image data, but in reality, we know that many objects can appear blacker than the darkest spot in a clear blue sky or whiter than the lightest blue of a blue sky. If you normalize such an image, you will find that it’s of an unnaturally high contrast.
But even if a small cloud or part of a horizon appears in the image, histogram stretching will be able to locate more appropriate min and max colour values to render your scene correctly.
The blue sky problem is fairly uncommon as these types of images are rare — the sun, stars, or any objects in the sky will usually appear on the histogram and guide the colours into their appropriate levels. Photographing bare single-colour walls may cause similar issues, but that’s less likely as the real-world lighting and slight imperfections in such scenes usually provide enough data for normalization to work properly.
The golden hour is a natural phenomenon when the typically white sunlight gets filtered and shifted towards yellow. This turns the highlights into yellows, whereas the histogram stretching method assumes those to be white. However, this issue is also fairly rare as even in those scenes, there is usually a very complex gamut of colour across most scenes, some of which usually include pure whites and pure blacks.
Curiously, I’ve noticed the above issues in film negative inversions made by VueScan and SilverFast, which may be a clue to the algorithms these tools use under the hood. Still, that’s never certain; I suspect there are more colour-correction steps involved, which you, as a photographer, may have to unknowingly undo or live with if they don’t match your expectations.
Lastly, while this is not specifically a problem with the method, the way the image data is sampled can play a significant role in the quality of your histogram-stretched results.
For example, if your photos are over-exposed, histogram stretching will compensate for the fact (while increasing the contrast of your image) if you’re looking at a histogram that encompasses just the exposure. But if you include the film border in your histogram, your result will not have their exposure compensated — the contrast level will match your film’s, and the image will look bright/washed out.
Thus, the quality of your film negatives, when inverted using histogram stretching, will depend on the quality of your exposure and the area of the image that you select to determine your histogram values.
Does histogram stretching cancel the effect of colour filters?
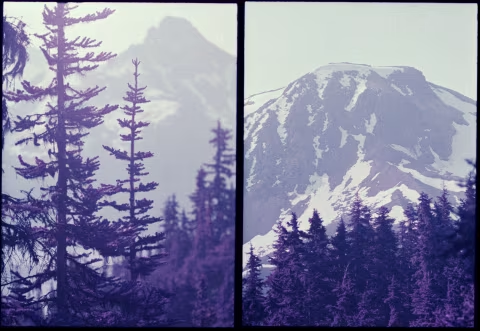
No. While histogram stretching will “rebalance” your colours, it will not alter the colour balance across all bands. Your Lomochrome Purple film will still be purple, and your redscaled film will appear red.
The reason your colours remain unchanged is that the images with such effects still fade into pure blacks and have pure white highlights. It’s everything in between those extremes that encodes the complex colour-shifting patterns.