Polaroid Color 600 Film Review & Shooting Guide
Inc. I-Type Colour Films, Go, and 8x10 Packs
13 min read by Dmitri.Published on .
Polaroid 600 Color instant film works with all classic Polaroid cameras¹ and all the new full-size Polaroid cameras (including the I-2).
The 600 is the most versatile and likely most popular Polaroid film.
Polaroid 600 Color emulsion is also used in Polaroid Go, I-Type², 8x10, and some special-edition film packs. You can apply most things written in this article to those products.
In this review, I’ll cover all the image/quality/technical specifications (like dynamic range) and list a few exposure, storage, and responsible disposal tips.
I’ll also discuss whether Polaroid colour emulsions are worth the cost, considering their limitations and imperfections, and briefly compare 600 vs. SX-70 vs. Instax films.
In this film review: Polaroid 600 colours. Polaroid Color 600 vs. SX-70 colours. Polaroid vs. Instax colours. Polaroid 600 film grain, sharpness, and resolution. Polaroid 600 Color development times and techniques for better results. Polaroid 600 Color film exposure guide. Polaroid film dynamic range and film characteristic curves. Scanning Polaroid film. Polaroid film print frame build quality. How to store Polaroid film safely before and after exposure. Recycling used polaroid film cartridges. Is Polaroid film worth the price? Where to buy Polaroid 600 Color film. Support this blog & get premium features with GOLD memberships!
¹ — You can shoot Polaroid 600 film in modified SX-70 cameras, with ND filters, MiNT Flash Bar 2, or using the backlit exposure technique without accessories or modifications.
² — I-Type instant film is identical to Polaroid 600 film, only without a built-in battery. It works with all the new Polaroid cameras with integrated rechargeable batteries, but it won’t work with vintage Polaroid cameras (unless modified).

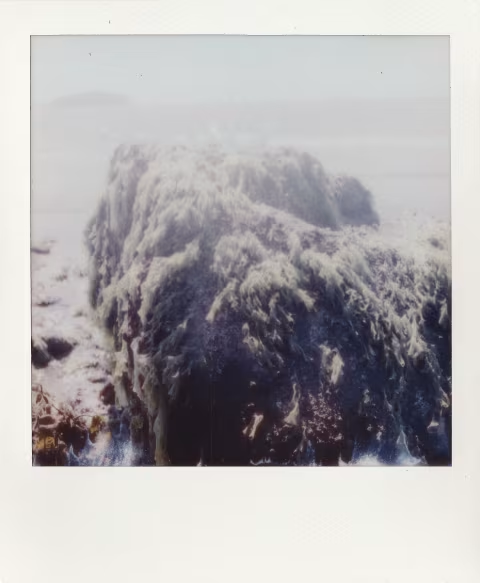
Above: Polaroid 600 Colour Round Frame Edition (review), shot in SX-70 with MiNT Flash Bar II.
Polaroid 600 colours.
Some film is as good as digital cameras at colour reproduction. Instant film is not.
Polaroid 600 colours often shift towards pink in the highlights and green in the shade. In cold weather, you can expect to see teal colour shifts. This often results in a warm palette that many photographers prefer to the Fujifilm Instax’ more accurate but uniformly cool colours.
The print gamut of Polaroid 600 film is limited (i.e., this film may not pick up nuance tonal changes you’d expect to see on a digital camera), but the gradients are silky-smooth thanks to the ultra-fine grain chemistry.
The colour saturation of Polaroid 600 film is natural and consistent through all the exposure zones (from shadows to highlights). The saturation is also constant across all colour dyes (in contrast to certain Fuji films that preferentially saturate reds, for example).
Polaroid 600 is a high-contrast film, which can make it a difficult format to shoot (the shadows and over-exposed highlights quickly become ineligible). However, it can still render natural-looking portraits and certain scenes within its limited dynamic range (explained below).
Polaroid Color 600 vs. SX-70 colours.
Polaroid 600 and SX-70 film colours are very close; those films are nearly impossible to ID on their own. But when viewed side-by-side, some subtle differences may become apparent:
SX-70 film tends to shift its colours towards light purple in the highlights and navy in the shadows — as opposed to 600’s pink highlights and green shadows. You may also notice that the SX-70 film renders a bit more contrast.
Polaroid vs. Instax colours.
Only two brands produce instant film today: Instax and Polaroid. And out of the two, Polaroid is the least colour-accurate.
However, Instax film isn’t free of colour shifts; it’s known to shift its palette towards cool tones, and in the cold weather, you may notice blue casts. Polaroid’s tendency to produce warmer tones is often preferred by photographers.
In addition to the different ways those films render colours, the formats are differentiated by size (Polaroid film frames are larger than all Instax varieties, inc. the Wide), exposure times (Instax is a lot faster), exposure mechanics/layer construction, and emulsion varieties.
Polaroid has four base emulsions: colour and monochrome in ISO 640 (600) plus the same in ISO 160 (SX-70); additionally, the brand periodically releases limited edition colours such as Duochrome Green and Reclaimed Blue. Instax only has colour and monochrome films.
Polaroid 600 film grain, sharpness, and resolution.
Whereas most film will produce noticeably larger grain on higher-ISO emulsions, instant film does not suffer from that drawback. Even the (long defunct) packs of ISO 3200 instant film show very little visible grain, whereas all current instant films, including Polaroid 600 (ISO 640), Polaroid SX-70 (ISO 160), and Instax (ISO 800), are virtually grainless. This is thanks to the development process that facilitates direct molecule migration between the layers instead of agitation in a tank (Light and Film, 1970).
However, the grain-free nature of Polaroid film does not necessarily translate to sharp images. This 600 lacks sharpness compared to most standard film — partly due to the chemistry but also because of the clear plastic layer meant to protect the emulsion. This layer likely softens the images during the exposure process, although it can be removed directly from the pack in some instances or via washing during an emulsion lift, which will reveal an already sharper resulting print.
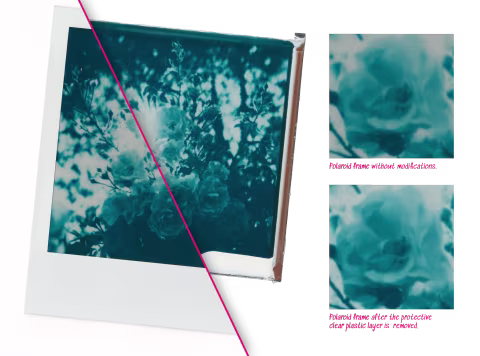
Above: If you don’t mind experimenting with your Polaroid film, you may try deconstructing it — which can improve the image quality. To do this, you’ll need to follow the emulsion lift instructions, stopping short of soaking the film in the water but ensuring that the clear plastic is peeled off. Note that I’ve only tested this method with freshly-exposed Polaroid 600 Reclaimed Blue film. I highly recommend you practice this method on frames you don’t mind destroying (this is a delicate, time-consuming procedure that doesn’t always work).
Polaroid 600 Color development times and techniques for better results.
Both the 600 and SX-70 varieties of Polaroid film take about 15 minutes to fully develop — in contrast to about 10 minutes for monochrome and Duochrome emulsions. This is about twice the time it takes Instax films.
For the most part, there’s little you need to do other than press a shutter button and wait for your image to reveal itself. However, extra attention to light, temperature, and agitation is guaranteed to give better results:
Hiding your frames from the sun as they develop will produce images with stronger contrast/clearer highlights. Whereas modern Polaroid cameras come with the “frog tongue” built-in, older cameras can benefit from one as well (you can install it yourself), or you may want to quickly hide your photo from the sun as soon as it pops from the camera.
Cold weather can diminish Polaroid film’s ability to develop properly. It can yield strong teal colour shifts unless the film is kept warm. You can prevent this by placing your frames into a breast pocket close to your body as soon as they pop out.
Shaking your Polaroid picture is something many of us want to do. But most photo nerds will warn you against it, as agitating your frame while it develops can slightly reduce the sharpness of your results.

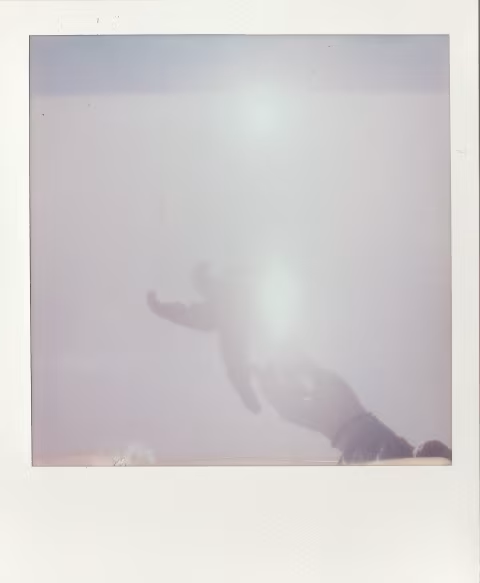
Above: Polaroid opacifier layer sunlight exposure test. The right side of this photo was shielded from direct light immediately after exposure — the left wasn’t. The difference isn’t huge, but a noticeable degradation of highlights can be seen to appear on the left. To learn more about this experiment and how the sun can degrade the quality of your polaroids (and how to prevent that), read this article.
Polaroid 600 Color film exposure guide.
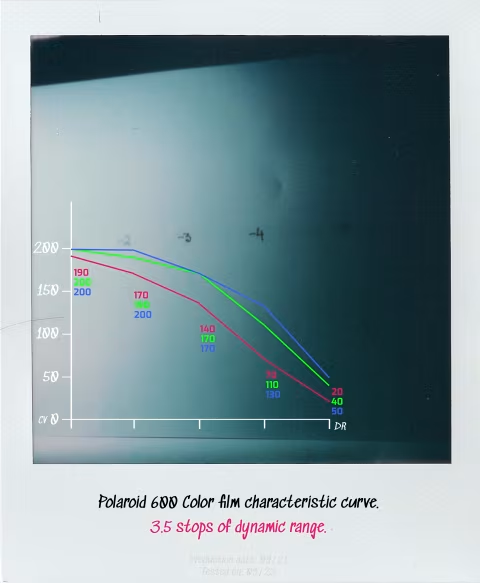
To understand how to expose film with minimal loss of detail methodically, it helps to look at its characteristic curves graph. Film characteristic curves inform you of the dynamic range and contrast profiles, which can help you plan your exposures.
Polaroid 600 Color film has a narrow dynamic range of 3.5 stops, which means it needs even lighting to render all shades and highlights. In high-contrast situations, such as backlit scenes, details will be lost in shadows and highlights.
Four stops of dynamic range are enough for portraits in most situations if you ensure that your subject’s face is exposed correctly with a spot meter or an incident light meter. Unfortunately, Polaroid I-2 is the only camera that works in manual-exposure mode natively (which lets you dial in your light meter readings). The remaining alternatives are the professionally modified Polaroid SX-70 cameras by MiNT ($1,000) or an Open SX-70 mod that you can perform on your own time.
Shooting your film with the flash “on” (even in daylight) at the distances where the flash is active (typically 3-5m/9-15’ away from the lens) will help you to fill the shadows and minimize under-exposed areas. Built-in light meters on most Polaroid film cameras will work best with the flash “on.” Consider placing your subjects close to a solid background (i.e., a wall) for an evenly-lit exposure with a flash.
Choosing low-contrast scenes, such as foggy/overcast days and plain/evenly-lit backgrounds (no harsh shadows), will also help you avoid over- and under-exposures. You may turn the flash off for these types of scenes.
Polaroid film dynamic range and film characteristic curves.
As a habitual instant film shooter, I know that Polaroid has a narrow dynamic range (making it a difficult film to work with). But until recently, I never knew exactly how difficult Polaroid film is to shoot compared to other films.
Films with a wide dynamic range are more forgiving of exposure mistakes and are less sensitive to high-contrast scenes. Kodak Portra 800 is an example of such a film, with about 12.5 stops of dynamic range. This film can handle a few stops of over/under-exposure, and it works well in high-contrast scenes. On the other hand, Kodak Aerochrome’s three stops of dynamic range make it one of the most challenging films to shoot: even a single stop of over-exposure can lose over 30% of detail.
To understand Polaroid film better, I decided to measure its dynamic range at home, using a sheet of paper, a strategically placed light, and a light meter. I then made a few test exposures and measured RGB values after scanning the film (as a substitute for densitometer readings) and plotted my findings on a graph. My estimate for Polaroid 600 Color film, according to those measurements, is 3.5 stops of dynamic range — which means it’s nearly as difficult to expose as the notorious Kodak Aerochrome film.
For more info about the method and film characteristic curves for other Polaroid films, download the datasheet PDF:
➜ Free Download: Polaroid Film Characteristic Curves (PDF)
Scanning Polaroid film.
Digitizing Polaroid film frames is not as easy as it may seem. The transparent plastic layer on top creates an intense glare that can be difficult to avoid if you’re trying to photograph it using your phone or a digital camera. Choosing a diffused light source and taking a picture at an angle (and then correcting perspective digitally) are some of the you can battle it.
On a flatbed scanner, you’ll encounter another issue: Newton’s rings. They may not appear visible on small screens but are easy to spot on a larger monitor. Some ways of combatting that include custom hardware and using a healing brush in Adobe Photoshop. Or you can try the method of removing the plastic layer (described above).
Polaroid film print frame build quality.
Polaroid film is encased in a frame that, aside from making it instantly recognizable, is useful for protecting and showcasing the results engrained in the emulsion.
The construction of the frame is complex. It’s made of ultra-thin aluminum foil that makes the white border around the film, a transparent plastic layer that covers and protects the emulsion, a writable paper insert at the back of the frame, and many other internal components. The entire thing is light and flexible, about the thickness of a sheet of cardboard.
Unfortunately, the protective transparent plastic layer can reduce the sharpness of your prints (which may be fixed with considerable effort via an emulsion lift). It also introduces glare and Newton’s rings that make scanning Polaroid film difficult. And while this layer does protect the emulsion from scratches, it is not scratch-resistant on its own; this is simply the nature of the material.
How to store Polaroid film safely before and after exposure.
Please refer to my Polaroid SX-70 film review for complete advice. In summary, you can follow these three tips:
1) Store your unused Polaroid film pack in a fridge (NOT the freezer!)
2) Let your pack warm-up before shooting, and keep your freshly exposed frames in your breast pocket as they develop.
3) Keep your exposed Polaroid photographs away from direct sunlight (better yet, in shade or dark storage space) to avoid fading. I recommend Polaroid Photo Boxes.
Recycling used polaroid film cartridges.
Polaroid film packs for SX-70 cameras have a plastic frame, a metal spring, and a non-rechargeable battery. After you deplete yours, you should break the plastic frame (⚠️ carefully; the plastic shards can be sharp!) and recycle the plastic, metal spring, and battery separately.
See my guide for recycling Polaroid film for step-by-step instructions with illustrations.

Is Polaroid film worth the price?
The value of photographic tools, as is the case with most creative peripherals, isn’t solely dependent on sharpness and colour accuracy. If you value those qualities in your work, this may not be the film for you.
But even for the detail-obsessed, this film offers some features no other emulsion or photographic technology does: an instant print in colour with a hefty, well-made construction and the largest image area on the market.
As of September 2023, a single pack of Polaroid Color 600 film costs $19.99 or $2.50 per frame (there are eight frames per pack). If you’re using a new Polaroid camera, such as I-2 or Now, an I-Type film pack will set you back $16.99 or $2.12 per frame. These prices do not account for various pack/special-edition discounts and the other two formats: Go & 8x10.
To put these prices into context, a 10-pack of Portra 400 4x5 film may cost $100 or $10/sheet today. 4x5 is double the area of a standard Polaroid frame; thus, Polaroid Color 600 film is half the price of Kodak Portra 400. Better yet, Polaroid film prices remained unchanged for the past five years — despite the inflation and other emulsions’ skyrocketing costs.
Polaroid film is priced competitively, though that doesn’t make it cheap. If you like how it renders your scenes and appreciate an instant physical print, this film is worth the price — as long as you try to make the best of every exposure using the tips in this guide.
Where to buy Polaroid 600 Color film.
Polaroid 600 film is sold widely. You may find it at your local lab, photo store, and, of course, online. You may also find deals on this film by buying more than one pack, which I usually do and store my stash in the fridge. The factory that makes it is alive and doing well.
❤ By the way: Please consider making your Polaroid 600 Color instant film purchase using this link so that this website may get a small percentage of that sale — at no extra charge for you — thanks!