Harman Phoenix C-41 Reversal Process (Rodinal)
I Tested 7 Recipes for HARMAN PHOENIX SLIDE FILM With C-41 and Rodinal
17 min read by Dmitri.Published on . Updated on .

Harman Phoenix 200 is the company’s first colour-negative film in over five decades¹. To make Phoenix, Harman repurposed the technology within the Ilford XP2 Super emulsion — a black-and-white film that can be developed in C-41 (colour) chemicals.
Aside from being compatible with colour-negative developers, XP2 comes out of development with a striking purple base. The colour does not come through scans or in print if done properly.
Harman Phoenix has its own wild colours — mint-yellow when fresh and purple when developed as a colour-negative. However, the purple film base can be made fully transparent when Harman Phoenix is developed as a slide film.
Harman Phoenix E-6 slides have a strong blue/green cast, which can be corrected to various degrees depending on exposure and how the film was developed. However, using the most common developer chemicals found in film photographers’ bathrooms, you can experiment with base colour and exposure to yield scans that feature softer grain and cleaner shadows.
In this article, I will show you how I developed and scanned Harman Phoenix as a slide film with just a C-41 kit and a bottle of Rodinal.
⚠️ Warning: The development times I will be providing in this article are approximate. Use them as a starting point. Beware of reticulation and blue colour casts of various intensities. Harman has just reformulated their chemistry, which may or may not work as well as the original Phoenix. I’ll update this article with new samples and development times as I continue to experiment and learn more.
In this guide: Why develop Phoenix 200 as slides? An experimental process. Reversal development with C-41. Snip tests and test strips. Phoenix 200 in C-41 reversal with Rodinal test results. Scanning and colour-correcting Phoenix 200 slides. Suggested development times, techniques, and temperatures. Problems to solve. Support this blog & get premium features with GOLD memberships!¹ — The exact history is not easily accessible, but this page suggests that after the 1960s, any colour film product from Ilford would have been manufactured by a third party.

Why develop Phoenix 200 as slides?
There are several issues with this method (mentioned above and discussed below in detail). However, developing Phoenix 200 as a slide film has several advantages over the standard colour-negative process:
Silky-smooth grain. The original Phoenix 200 yields sharp, chunky grain as a colour-negative. The updated variant, Phoenix II, features finer grain, but that still does not compare to the virtually imperceptible grain quality of Phoenix 200, developed as a slide. The reversal process removes opaque, sharp-looking silver crystals, leaving just the dye clouds behind, which do not carry the jagged sharpness.
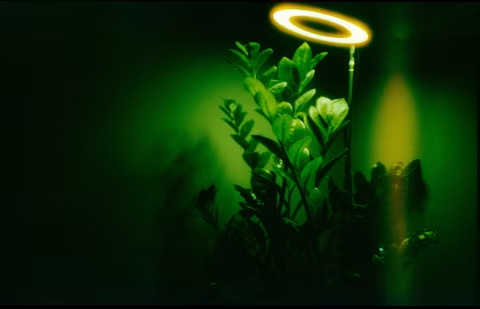
Halation. No other slide film produces the halation effect like Harman Phoenix. When developed as a slide, the results often render it in orange rather than the red you’d expect from Kodak Vision 3 and CineStill films.
Harman Phoenix is cheaper than all but some expired slide films on the market. It’s distributed widely, generally found anywhere Ilford film is sold (I bought mine at a local drugstore chain, which was convenient for this project). Developing in colour-negative film chemicals with a common black-and-white film developer makes the reversal process even more accessible by saving more money on expensive E-6 chemistries or trips to a lab.
Last but not least, it feels nice to pull ready-to-view positives out of the development tank (more so than negatives, in my opinion). The process of fogging the black-and-white negatives is also quite fun (you get to see images mid-process).
An experimental process.
The C-41 reversal process, a method of developing slide film, is known to produce slight colour shifts with actual slide film. C-41 reversal recipes with Rodinal are poorly documented, with contradicting development times and dilutions. I tried seven variations of the recipe at different times and temperatures; only about a third of them succeeded (I will share those first).
Harman Phoenix has a relatively clear base (at least when compared against the typical orange mask on colour-negative film). This is good for getting viewable positive images. However, when developed as a slide film, whether via the method in this article or via the standard E-6 process, the film often renders a strong blue or green cast that may or may not be sufficiently correctable.
If the development times, temperatures, or agitation are off, the film can come out too dark or too bright, in each case resulting in unscannable images. However, as you may’ve noticed already, it’s possible to create a unique look with very soft, almost invisible film grain and fun physical artifacts.
Shooting Phoenix 200 at box speed may not yield enough exposure for a good positive. I tried two different exposures in my experiments. I’ve also tried both old and fresh C-41 mixtures with varying results (I almost prefer the exhausted developer).
This process is more time-consuming than a typical C-41 session; allow yourself an extra half hour to develop Phoenix 200 using this method.
Reversal development with C-41.
Reversal development with the standard C-41 chemicals and a black-and-white developer is not a new process. There are several articles, videos, and forum posts on the topic (although most of them focus on using Kodak HC-110 as a first developer).
C-41 reversal is similar to the standard E-6 process, with the exception of less optimal colour control and longer development times. Whereas a typical E-6 process will not ask you to pull the film out of the tank mid-process (the built-in chemistry does that), C-41 reversal comes with what I think is a fun intermediary step:

C-41 reversal works by first having the black-and-white developer remove silver from the shadows. Next, without fixing, the film is exposed to bright light (fogged), which sensitizes the silver that the first developer left behind in the highlights. Lastly, the C-41 process develops the colour dyes with silver in highlights and then removes the remaining silver during the bleaching step, yielding a colour positive.
Snip tests and test strips.
Phoenix 200 is already an experimental film, according to its maker. Subjecting it to an alternative process that’s known for colour casts and other issues is bound to ruin some film. Which is why I developed several strip tests to try various development times, techniques, and temperatures.
But even after weeks of trial-and-error, there’s still plenty of room for improvement. If you choose to try this at home, you may want to split your roll of Phoenix into several strips, which should help you refine the recipe further. I recommend shooting Phoenix in 35mm and retrieving the leader before development. This way, you can load about a forearm’s length of film into your reel in the dark bag and retrieve the remaining contained roll for the next set of tests.
Doing this will inevitably cost you one or two exposures on either side of each strip, but you will have one or more chances to adjust your development for better results. Make sure you review the results I’ve shown in this article to understand the extent of changes you can make to development times without overcorrecting.
Your most important control will be the development time, temperature, and agitation during the black-and-white step. Increasing the time, temperature, or agitation will yield a denser positive.
Reminder: Test your C-41 chemicals to make sure they work! You may also like to use a tool like Chem Log to track their use and expiration.

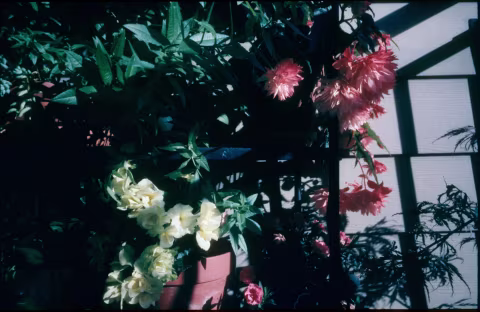
Phoenix 200 in C-41 reversal with Rodinal test results.
Developed as a positive, Phoenix can produce a strong contrast and saturated colours with various artifacts. Some of my results, like the photo directly above, felt like they were on the edge between unusable and interesting. There can be expressive value in images like that, but my goal with this process was to produce images that resemble Velvia 50 or Ektachrome E100 — at a fraction of the price. Thus, I’ll start by sharing the recipe for what I felt had the highest quality positives: