How to Fake CineStill 800T
Testing the “CineStill Is Just Kodak Vision 3 Film Without Remjet” Myth
14 min read by Dmitri, with image(s) by yhanson100 and Daren.Published on .

In the wake of Kodak’s major change to its film chemistry and two years after the 800T branding controversy, we tested the internet myth surrounding the production of CineStill films.
The results were entirely unexpected. We ran our tests twice! In this article: The myth. Kodak’s AHU: no more remjet. The motivation. The experiment. We had to do it twice. Removing the remjet from Kodak Vision 3 film at home. The results: CineStill 800T vs. Kodak Vision 3 500T (with home remjet removal) vs. Kodak Vision 3 500T (unmodified). Photographic desensitization and hypersensitization. Behind the curtain. Support this blog & get premium features with GOLD memberships!
This article is written in collaboration with Vancouver photographers Daren @LearnFilmPhotography and Yvonne @YvonneHansonPhotography, joined by Shawna @arielmixedmedia in front of the camera. Please follow their channels for more content about art and film photography!
The myth.
The myth claims that CineStill’s signature films are simply Kodak Vision 3 motion picture film with the remjet layer washed off before being packaged and sold for twice the price.
An extended version of this myth claims that CineStill 800T, the company’s best-recognized film, is Kodak Vision 3 500T without the remjet, and the increase in the film’s ISO is either due to light bouncing off the pressure plate or a greater sensitization efficiency of the C-41 chemicals compared to ECN-2.
Kodak’s AHU: no more remjet.
I learned about Kodak’s new technology, which no longer includes remjet on their Vision 3 films, as I was finishing up pre-production plans for this article. Anti-Halation Undercoat is an integral component that does not need to be washed off — this means that the new Kodak Vision 3 film can be processed at regular labs and at home without the need for a remjet pre-bath.
Unfortunately, Kodak’s switch to AHU means that the supply of Vision 3 film with remjet is limited to the diminishing stocks. This raises questions about the future of CineStill’s signature halation look, as well as the feasibility of replicating that look at home for less (using the methods in this article). I’ve asked CineStill about this directly, but haven’t heard back.
🎧 You can also listen to the new Analog.Cafe Podcast episode where Daren and I discuss Kodak’s AHU update and this project in great detail. Available on Spotify, Apple Podcasts, iHeartRadio, and Overcast.
The motivation.
Even if remjet is going away, I suspect there may be some misconceptions about this technology and how it is used. It would be a shame to leave that unchallenged.
Working directly with the medium to test theories is one of the best ways to gain a deeper, real-world understanding of how it works. I think that these sorts of insights are useful for anyone who wants to make better photos, create something new, or is simply curious and doesn’t want to be misled by oversimplifications of complex and fascinating photographic processes.
The experiment.
CineStill 800T has been available for over 13 years, and yet there have been no documented independent attempts to reproduce this product based on common knowledge and rigorously compare those results to the original. Successful commercial attempts have been proven possible (about a decade after CineStill’s release), but is it really as simple as a pre-wash and dry?
This experiment is designed to test whether the CineStill 800T process can be replicated at home and, if so, how well it performs compared to the original.
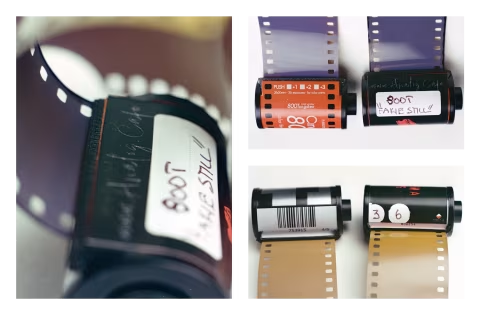
To understand the possible differences between CineStill 800T and the home-made version, we will be comparing three stocks in 135/36exp:
1) Kodak Vision 3 500T (with the remjet pre-washed, a.k.a., our “fake CineStill”).
2) The authentic CineStill 800T.
3) Kodak Vision 3 500T (with remjet).
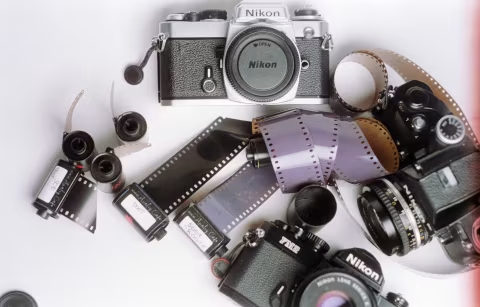
I purchased 50mm lenses for my three vintage Nikon cameras: the F2, the FM2n, and the FE, to get the same angle of view on all film rolls using an identical optical formula.
Daren and Yvonne joined me on camera duty, where we took our Nikons around New Westminster and made bracketed exposures at EI 400/800/1600 for all films.
We selected a range of scenes, including indoor daylight-balanced lighting and indoor tungsten-balanced lighting (with my Amaran lights), indoor flash, outdoor evening light, outdoor mixed light at night, and some neon signs.
All films were developed in C-41, scanned on Nikon SUPER COOLSCAN 5000ED with VueScan and inverted with film Q — no edits (histogram stretching only), assembled in Photoshop. Some images had very light colour correction applied for easier comparison between the sets (no change to contrast or exposure).

We had to do it twice.
We’ve got good test samples during our first session, but there was a problem. An issue with one of our cameras caused an entire roll of CineStill 800T to be shot as blanks, which means we could only compare Kodak Vision 3 films (with and without remjet).
So we got together one more time to fix the blunder. This time, aided by Shawna as our model.

Removing the remjet from Kodak Vision 3 film at home.
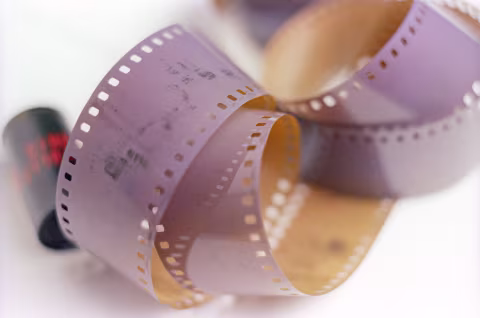
Removing remjet from Kodak Vision 3 film during processing (as it was designed) is a laborious task. It involves soaking film in an alkaline solution along with vigorous agitation and multiple water exchanges before processing in ECN-2 or C-41. Even with the pre-bath formula designed by Kodak, some debris may remain on film and in the chemicals, which would need to be cleaned up after scanning.
☝︎ Further reading: “Developing Colour Film as an Absolute Beginner.”
Removing remjet before loading film into the camera presents some advantages: the roll can be dropped off at any lab, and the film gains the ability to render halations — a signature CineStill look. Unfortunately, this is a lot more difficult than doing so during the development.
Loading unexposed film into a Paterson tank and washing off the remjet layer is no different than doing so with an exposed roll of film that’s about to be processed. But spooling that “clean” film back into a film canister puts up a few annoying challenges:
Photographic film is sticky when wet. Once stuck, film strips can remain permanently attached after drying; attempting to peel them apart would ruin the emulsion.
Drying film in a light-tight space is very challenging. The remjet-washing step during normal development is followed by a full development process that allows the film to be dried in daylight. This is not the case in our process, as the film is yet to be exposed, and thus it must be kept away from all visible light.
Leaving the film in the Paterson tank overnight is not sufficient. I kept mine on a balcony for an entire week, only to discover that it was still wet and sticky, which ruined an entire roll of Kodak Vision 3 film.
The problems continue.
Loading film into a canister is an awkward, multi-step process. Once the film is dry, it must remain in the dark. Feeding it into a 135 canister in pitch-black is highly problematic. But there’s one more challenge to overcome: if you don’t pay attention, you may accidentally redscale your film (load it into the 35mm canister the wrong side up).
After learning that drying in a Paterson tank may take more than a month, I’ve attempted to dry my “clean” film in a bathroom. I didn’t want to spend hours in a dark bathroom either, so I had to blackout my entire room and hang rags around my bathroom door to further minimize stray light entering the room. This experience was insane, and I do not recommend it.
Having transformed my entire apartment for a single roll of film, I decided to “hack” my drying time instead, using a hairdryer set to “cold.” If you decide to replicate this experiment at home, this is the best approach.
Neither the blackout bathroom roll nor the hairdryer roll showed any light leaks; the results on both looked identical.
At last, after all this work, planning, and coordination, it was finally time to shoot some film, develop it, and see how it all turned out.