How to Make a Polaroid SX-70 Gingerbread House
Recipe, Printable Template, and Detailed Instructions
9 min read by Dmitri.Published on . Updated on .
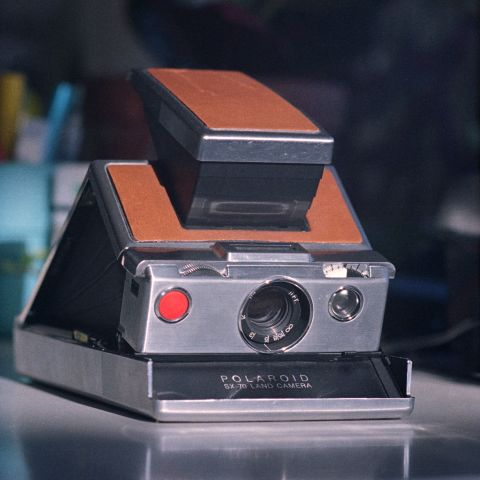
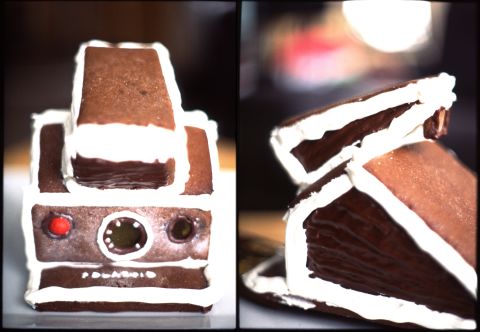
I love my Polaroid SX-70 instant film camera. It’s instantly recognizable, and it can make really good photos. But wouldn’t it be better if it was edible? 😋
If you’re looking for something deliciously analogue for your holiday table, I’ve got just the thing for you: an intricate and delicious Polaroid SX-70 gingerbread house recipe and build guide.
Not all gingerbread recipes will let you make thin construction material strong enough to withstand the entire weight of the sculpture. Thankfully, my partner, Betty, is a seasoned home cook who can recognize a good one.
This guide has everything you need to get started with your tasty SX-70 construction. It even includes translucent lens design instructions that you can use to gently illuminate your dusk table (when you place a battery-powered candle inside).
Print this guide.
Making gingerbread dough from scratch is a multi-day project that’s best to work on with someone who knows their way around a kitchen, at least a little bit. I suggest you print this guide along with the templates for the camera parts.
If you’ve got your ready-made dough, you may skip the recipe instructions (but you will still need to print the template, make icing and decorative candy glass). For best results, read this guide in its entirety before getting started.
➜ Free Download: SX-70 Gingerbread Recipe + Printable Template (PDF)
Gingerbread recipe.
We used this New York Times recipe to source the ingredients and put them together for the gingerbread Polaroid camera. Unfortunately, if you don’t have a subscription to their services, you may hit a paywall.
Good thing recipes aren’t copyrightable. And so I’m sharing our version of the gingerbread mix here for your convenience, along with a bunch of things NYT hasn’t mentioned.
Schedule.
Day 1: Shopping and mixing the dough.
Day 2: Shaping and baking.
Rest for 3-7 days. This step may be shortened slightly.
Day 7-ish: Make icing, fudge, and assemble.
Ingredients.
🧈 1lb (454g) of unsalted butter (4 sticks) at room temperature.
🧑🍳 2½ cups + 3 tablespoons (595g) dark brown sugar.
🧑🍳 12¾ cups + 2 tablespoons (1,648g) all-purpose flour with some extra for dusting.
🧑🍳 2 heaping tablespoons (15g) of ground ginger.
🧑🍳 2 heaping tablespoons (15g) of ground cinnamon.
🧑🍳 1½ tablespoon of baking soda.
🧑🍳 ½ teaspoon of baking powder.
🧂 ½ teaspoon of salt.
🧑🍳 2 cups of molasses.
🍋 Zest of 2 lemons (optional).
🍊 Zest of 2 oranges (optional).
🥚 9 eggs (4 for dough, 2 for icing, and 3 for mousse; the icing and the mousse will be made a few days after the dough).
The rest of the ingredients will be used a few days after you finish baking your gingerbread on the day of the assembly:
🍫 5¼oz (150g) of coarsely-chopped dark chocolate (for mousse).
🥛 14oz (400g) of heavy cream (for mousse).
🧑🍳 1oz (28g) of sugar (for mousse).
🧑🍳 2lb (1kg) of confectioners’ (icing) sugar.
🍋 2 teaspoons of lemon juice (for icing).
🍭 High sugar content meltable candy (10-20g, enough to make the “lens;” it’s best to have extra for redos or to snack). I used butterscotch candy, but blue may be more suitable. Jolly Ranchers are a good option.
🔴 Red M&M, Skittle, or a similar candy for the shutter button. You only need one.
✨ Edible glitter (optional).
🕯 A small battery-powered tea candle (optional).
Tools.
You’ll need a kitchen with a working oven, a scale, bakers’ measuring tools (spoons and cups), baking trays, parchment paper, a printer (for paper templates), scissors, frosted tape, a mixer, icing tips & bags, a rolling pin, pizza knife, plastic wrap, and bowls.
✪ Note: You can find the concise shopping list table with links to the products at the bottom of this article.
Make the dough.
We’ll be making the dough in two batches. This is so that we can fit all the ingredients comfortably into a mixing bowl. The dough needs to refrigerate overnight.
Before you begin, let 4 eggs and butter warm to room temperature.
1. Use an electric mixer to cream together half the butter and half the sugar for five minutes until fluffy, and scrape the sides of your bowl.
2. Sift together all the dry ingredients in another bowl: flour, ginger, cinnamon, baking soda, baking powder, and salt. Take half of that and set it aside.
3. Set your mixer to “low speed” and add 2 eggs (one at a time). Add 1 cup of molasses to the bowl from step 1, slowly as you mix. Once your mixture looks homogenized, scrape the sides of your bowl so that they don’t dry up.
4. Take half of your dry ingredients and carefully add to your mixture in step 3. Do this by adding a tablespoon at a time and either cover your bowl with a towel or mix by hand to avoid flour flying everywhere. Mix in the zest of 1 lemon and 1 orange. Don’t over-mix: make sure you’ve got a homogenized dough, and then stop.
5. Take the dough from step 4 and wrap it in plastic wrap or plastic-free packaging. Refrigerate overnight.
6. Repeat steps 1-5 for the second batch.
Print the template.
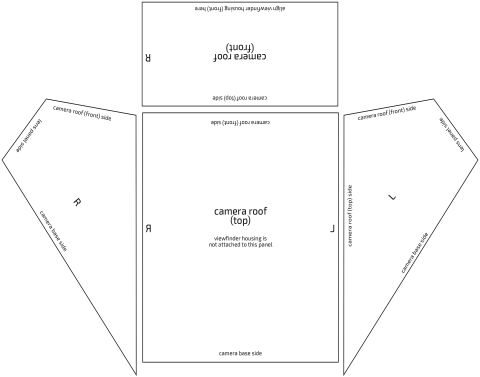
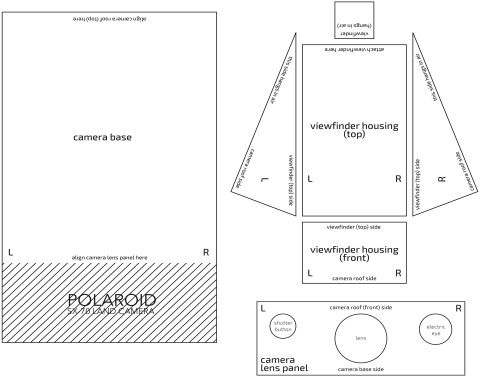
1. Print the template for camera parts and cut them out by following the solid lines.
2. Print another copy, cut, and assemble the paper into the camera shape using frosted tape to fasten the pieces together. This model doesn’t have to look good or be particularly sturdy. It’s a practice round for the real thing that ensures that you understand well how the parts fit together. You can skip this step if you like.
➜ Free Download: SX-70 Gingerbread Recipe + Printable Template (PDF)
Shape the dough.
1. Split your dough into ~20oz/550g balls and roll them out on a flat surface lightly dusted with flour.
2. Place the paper components on top of your rolled-out dough to ensure they all fit. Make adjustments to make sure that they do. You can cut the extra dough, re-integrate, and roll again. Pizza knife works well. I suggest you give larger camera components a little more thickness for strength. Your dough should be around ¼” (7mm) thick; in the oven, it will rise by about 2x.
3. Place the rough shapes onto baking trays with parchment paper lightly dusted with flour. Cut the dough so that you have your camera components as individual slabs. Cut the round holes for the lens, shutter button, and the “Electric Eye.” Use a small knife for intricate parts. You can also make cardboard tubes to poke out round holes precisely. If you have extra dough, keep it for “spare parts” and other fun cookie shapes later.
Bake.
1. Preheat your oven to 350℉/175℃.
2. Place about a teaspoon worth of crushed meltable candy into the lens and the electric eye round holes. It should fill the space, but you don’t want to add too much here as it could spill when hot.
2a (optional). If you can make a square-shaped form to replace the small viewfinder square you made out of gingerbread with a “glass” material, it will make a more realistic-looking item.
3. Place the baking tray into the oven for 25-30 minutes on the middle rack. Watch to ensure that your panel doesn’t burn, yet the candy is melted.
4. Once done baking, carefully transfer your gingerbread onto cooling racks.
Rest for 3-7 days.
Let your dough dry at room temperature. This will make it sturdy enough to support the weight of all the intricate deliciousness.
Make the icing.
1. Mix 1lb/.45kg of confectioner’s sugar, 2 egg whites, and 2 teaspoons of lemon juice. Add half an egg white to the mixture if you want it to be softer.
2. Scoop a cup of icing into your piping bag.
Make chocolate mousse.
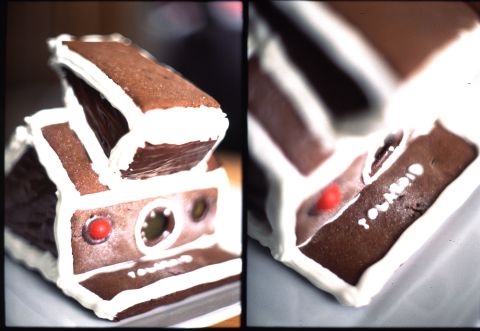
I used chocolate mousse to decorate the sides of the camera. It was dark and thick enough to create a texture similar to what bellows on my SX-70 look like.
Food Network has a pretty good recipe for it. I’ve integrated it into this guide, and the ingredients are listed above. You are set to make it.
1. Melt the chocolate in a bowl submerged in hot water. Keep it warm and melted but not boiling.
2. Beat the cream until it forms soft peaks and set aside.
3. Whip 3 egg whites until they form soft peaks. Add 1oz (28g) of sugar gradually until the mixture is firm.
4. Fold all of the eggs into the chocolate at once. Then immediately after, fold in the cream.
5. Let the mousse cool slightly and fill it into a piping bag.
Assemble your Polaroid SX-70.
1. Pipe chocolate mousse onto the outsides of your camera sides (the 2 largest wedge-looking parts). You may want to reference your template to make sure you remember which way to place them. The chocolate mousse here should simply cover the gingerbread, and if you’re feeling up to it, you can add some texture to make more realistic-looking bellows.
2. Repeat step 24 for the viewfinder housing sides that should face outwards. This includes the smaller triangle panels and viewfinder housing (front) but not the viewfinder housing (top).
3. Let your mousse-covered camera sides cool for 15-20 minutes in a fridge. You will need it to harden before proceeding to the next step.
4. Place your camera sides and pipe the icing on what would be inside of the camera to glue them to the camera base. You will need to hold them in place with your and a partner’s hands or lean against something to stay upright until this step is complete. Cans of food can work well as a temporary support.
5. Pipe some icing on the top edges of your camera sides and place the camera roof on top. Make sure it’s secured in place with supports.
5a (optional). Place your small battery-powered tea candle inside the camera and ensure that it’s turned on.
6. Pipe icing on the remaining edges of the camera sides and place the front camera roof and the camera lens panel. Make sure there’s icing on all the edges to secure the gingerbread.
7. Use the same technique as above to assemble the viewfinder housing (minus the viewfinder window).
8. Let your construction dry for 20-40 minutes.
9. Carefully pipe some icing, just enough to glue your viewfinder housing to the camera body, and let it dry for another 20-40 minutes with support in place.
Decorate and add finishing touches.
1. Use the icing to glue your tiny viewfinder square to the back of your viewfinder housing and let it dry for another 20 minutes.
2. Use the rest of the chocolate mousse and icing to add finishing touches to your camera. Place your camera button and make the Polaroid engraving. For the Polaroid engraving, I suggest printing a template and cutting out the letters carefully to use as a stencil. You can also use a little bit of edible glitter creatively.
This is a lengthy project, but you can make adjustments as you see fit. It’s possible to complete this camera in a three-day weekend by cutting down on some drying time for the cookie dough — but you’ll need to be extra careful with it.
Good luck, and have fun! 👏